End-to-End Tutorial
This tutorial presents an end-to-end procedure for creating a production workflow and making it available to end users. When you are finished, you will be able to run the workflow in an ArcGIS Web AppBuilder app or a Geocortex Viewer for HTML5 viewer.
If you have never created and run a VertiGIS Studio workflow before, you may want to start with the quick steps given in the Get Started section. The tutorial in the Get Started section creates a workflow that displays a message and runs the workflow in the Sandbox, VertiGIS Studio Workflow's built-in test environment.
Before you Begin
To create and use a workflow, you need:
-
An ArcGIS account. The specific type of account depends on the environment you will work in.
VertiGIS Studio Workflow can run in two environments—in the cloud or on premises. To do this tutorial, you must have access to one of these environments.
-
Cloud: To do this tutorial in the cloud environment, you need an ArcGIS Online account. You can use a public account or an organizational account. You can get a public account here for free.
-
On Premises: If your organization has installed VertiGIS Studio Workflow on premises and configured it to work with an on-premises installation of Portal for ArcGIS, you can do this tutorial with the account that you use to access your organization's portal.
The tutorial uses a public ArcGIS Online map service. To do the tutorial, your organization’s portal must have access to the Internet.
-
-
A web mapping application that is capable of running VertiGIS Studio workflows: an app created using Esri's Web AppBuilder or a Geocortex Viewer for HTML5 viewer. This tutorial shows you how to run workflows in both types of applications.
-
If you want to run the workflow in a Web AppBuilder app, you can either use Web AppBuilder in Portal for ArcGIS or Web AppBuilder (Developer Edition).
This tutorial assumes that Web AppBuilder is already installed and the VertiGIS Studio Workflow widgets are ready to use. See Prepare the Workflow Widgets for Web AppBuilder for information.
-
If your organization has Geocortex Essentials, you can run workflows in Geocortex HTML5 viewers. This tutorial shows you how to configure a viewer to run a workflow. The tutorial assumes that you have already configured a site and added a viewer.
-
See also...
Main Steps to Create and Use a Workflow
The main steps to create and use a workflow are:
- Create a new workflow.
- Build the workflow.
- Run the workflow in the Sandbox.
- Save the workflow.
- Share the workflow.
-
Configure a host application:
-
Run the workflow in the host application:
Tutorial - Create a Workflow
Step 1: Create a New Workflow
-
Launch VertiGIS Studio Workflow Designer and sign in if you are prompted.
If you are using VertiGIS Studio Workflow in the cloud, you can access Workflow Designer here. If you are using on-premises VertiGIS Studio Workflow, use your organization's deployment of Workflow Designer.
-
Create a new, blank workflow.
There are several ways to create a new workflow. The most common are the Dashboard and File menu:
-
Dashboard: The Dashboard opens when you open Workflow Designer. The Dashboard contains templates to create blank workflows.
- To run the workflow in Web AppBuilder only, click the Workflow for ArcGIS Web AppBuilder template.
- To run the workflow in the Geocortex Viewer for HTML5 only, click the Workflow for Geocortex Viewer for HTML5 template.
- To run the workflow in both Web AppBuilder and the Geocortex Viewer for HTML5, click Choose Environments, select the ArcGIS Web AppBuilder and Geocortex Viewer for HTML5 checkboxes, and then click Create.
-
File Menu: In the sidebar, click File | New, select Blank Workflow, and click Create. The New Workflow dialog box opens.
- To run the workflow in Web AppBuilder only, select the Workflow for ArcGIS Web AppBuilder checkbox and click Create.
- To run the workflow in the Geocortex Viewer for HTML5 only, select the Workflow for Geocortex Viewer for HTML5 checkbox and click Create.
- To run the workflow in both Web AppBuilder and the Geocortex Viewer for HTML5, select the ArcGIS Web AppBuilder and Geocortex Viewer for HTML5 checkboxes and click Create.
-
See also...
Step 2: Build the Workflow
This step shows you how to build a simple workflow that queries ArcGIS Server and displays the attributes of the returned features using an Item Picker form element.
When you build a workflow, there are certain things you can do to make the workflow easier to understand and maintain:
- At the beginning of the workflow, state the workflow's purpose. Use a Notes activity for this. Notes activities are placed to the side of the flowchart to comment the flowchart. They do not connect to other activities.
- Add Notes activities at key points in the workflow to describe the main parts of the workflow.
- Replace the default activity display names with more specific names. The display name appears at the top of the activity in the flowchart.
- Provide a description for each activity. The description appears below the activity's display name in the flowchart.
-
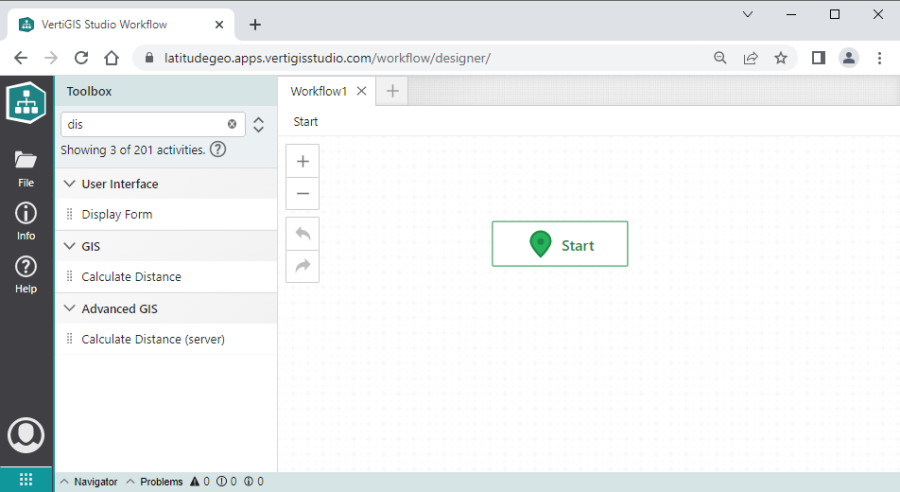
Find the Display Form activity in the Toolbox.
An easy way to find a particular activity is to type part of the activity's name in the Filter box at the top of the Toolbox. The Toolbox will show only those activities that match what you type.
-
Drag the Display Form activity to the design surface and drop it on the Start block.
Dropping an activity on the last item in the workflow automatically positions and connects the activity. In this case, the Start block is the last item in the workflow. You can also connect and disconnect flowchart items manually by hovering over the first item and dragging one of the arrows to the second item.
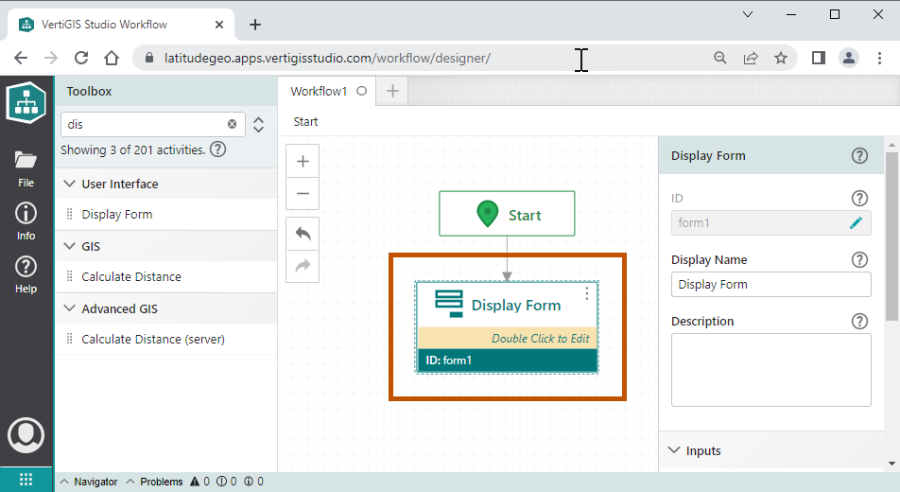
The Display Form activity's properties show at the right. These properties apply to the form as a whole. To configure the contents of the form, you will edit the activity.
-
Double-click the Display Form activity.
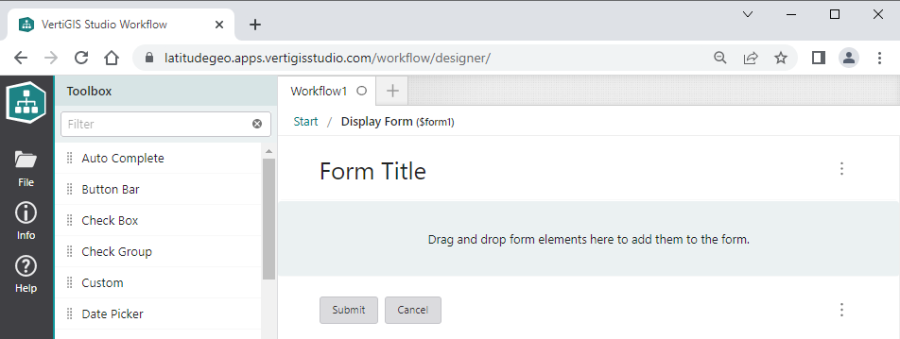
The form opens for editing. In this view, the Toolbox shows the building blocks of forms, form elements, instead of activities. Initially, the form has a header and footer. You will add elements from the Toolbox to the preview area to include in the form.
-
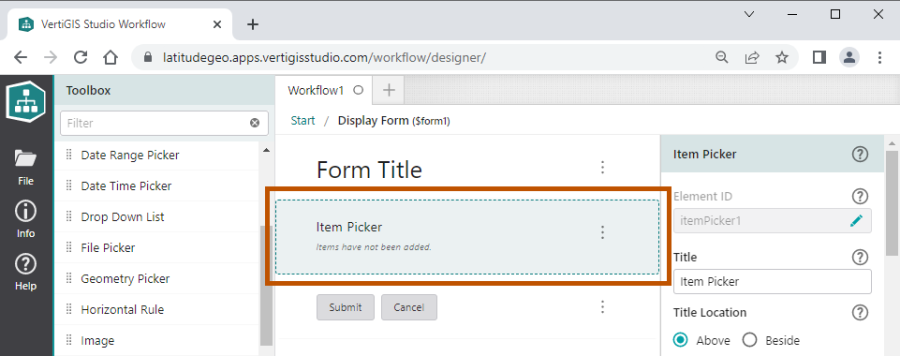
Find the Item Picker element in the Toolbox and drag it to the position indicated in the form preview, between Form Title and the Submit and Cancel buttons.
The Item Picker element is used to display a list of items to the user. In this case, the Item Picker will display features returned by an ArcGIS Server query.
-
In the Item Picker's properties, set Selection Mode to None.
The Item Picker element optionally allows the user to select one or more items. In this case, we do not want the user to be able to select items.
-
In the Items area of the Properties panel, click ArcGIS Query.
The ArcGIS Query subworkflow opens. The ArcGIS Query subworkflow is part of the Display Form activity, as indicated by the breadcrumbs (shown at
 in the screen capture below).
 Form elements can have subworkflows of different types. The ArcGIS Query subworkflow is a populate subworkflow. Populate subworkflows create the items that will populate the form element, in this case, the items that the Item Picker will display. When the Display Form activity runs, it loads the form and then runs the subworkflow to populate the Item Picker.
The default ArcGIS Query subworkflow (
 ) is a fully functional subworkflow that gets US states from an ArcGIS map service. The query returns two attributes: the state's name and population. It does not return the geometry. Normally you would adapt the ArcGIS Query subworkflow to your needs, but this is not necessary in the context of this tutorial. You will adapt the subworkflow to get states in a particular region. As well, you will get additional attributes and you will format how the attributes are displayed.
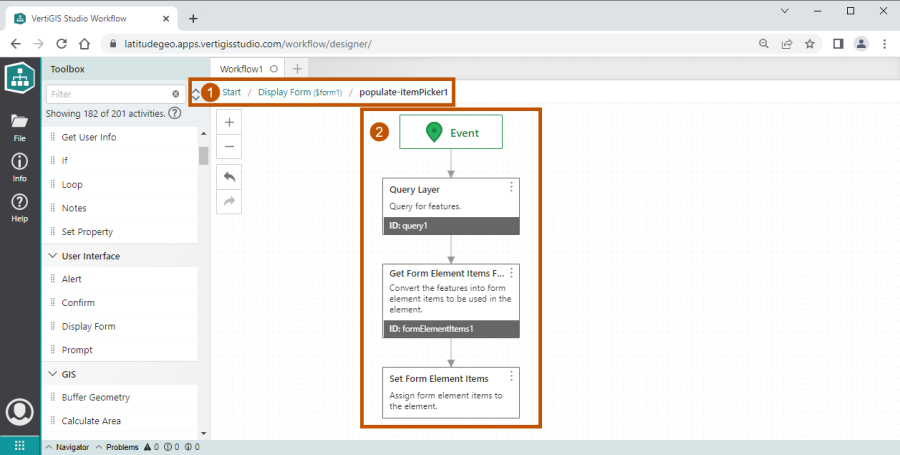
See also...
Step 3: Run the Workflow in the Sandbox
Test the workflow by running it in the Sandbox, VertiGIS Studio Workflow's built-in test environment. You can choose the environment to run the workflow in. In this tutorial, you will use the default environment, which uses version 3.x of the ArcGIS API for JavaScript and a two-dimensional map.
You can use your browser's console to see what is happening at each step in the running workflow.
-
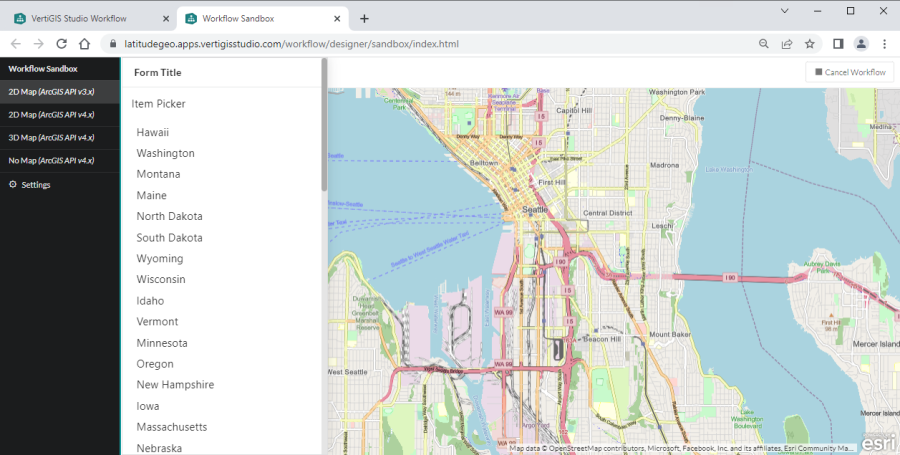
In the sidebar, click Info | Run in Sandbox.
-
Click Run Workflow.
The workflow opens the form and displays the US state names in the Item Picker.
-
Press F12 to open your browser's console and view the log.
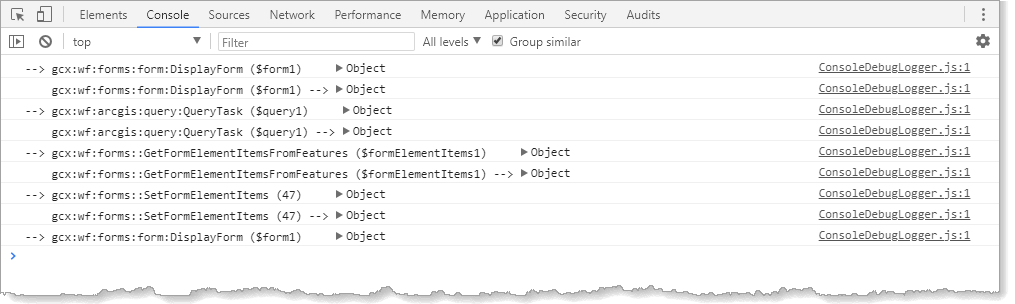
Verbose log, shown in the Chrome console
Log entries are usually in pairs. An entry with an arrow (-->) at the beginning indicates that the activity is about to run. An entry with an arrow after the name or ID indicates that the activity has finished running (possibly temporarily while a subworkflow runs).
To explore the log, click objects to expand their log entries. Continue to click items to see deeper levels of detail. For example, in the first line of the log, click
Object|inputs|formto show theelementsproperty. Theelementsproperty shows that the Display Form activity has three form elements: a Header, an Item Picker, and a footer (a special instance of a Button Bar element).Ignore log entries labelled
__proto__. They are not useful to workflow authors.
See also...
Use the Console to Debug Workflows
Example 2 - Verbose Log for a Query Layer Activity
Example 3 - Verbose Log for a Display Form Activity
Step 4: Save the Workflow
Workflows are saved as ArcGIS items. The workflows you have authored appear on your Content page. You can open a workflow's item in ArcGIS by clicking Info | View in Workflow Designer.
-
Save the workflow: click File | Save or File | Save As, or press Ctrl+S.
-
Enter a title for the workflow.
-
Click OK.
Step 5: Share the Workflow
To share the workflow, use the Share function in ArcGIS. When you first save a workflow, only you have access to the workflow. You can share workflows with groups that you belong to, with your entire organization, or with everyone (including the public). In this tutorial, for simplicity, you will share the workflow with everyone.
Normally we do not recommend sharing workflows with everyone unless the application is public and you want to allow everyone to run the workflow.
-
In the sidebar, click Info | View.
This signs you in to your ArcGIS account and opens the workflow item.
-
Click Share.
-
Select the Everyone (public) checkbox.
-
Click OK.
See also...
Step 6: Configure a Host Application
VertiGIS Studio workflows can be run from any of the supported types of host applications. Follow the instructions for the type of host application you are using for this tutorial:
Configure a Web AppBuilder App
VertiGIS Studio provides custom Web AppBuilder widgets that run VertiGIS Studio workflows in Web AppBuilder apps. In this step, you will create a new 2D app, add a Workflow widget to the app, and configure the widget to run your workflow.
-
In Web AppBuilder, create a new 2D app. Use the default theme.
-
Add the widget called Workflow. This widget runs a workflow in the side panel of a 2D app.
To add the widget, open the Widget panel, click Set the widgets in this controller, and then click the icon to add widgets
 . Select the widget and click OK.
Workflow widget
-
Click Choose Workflow.
-
Locate your workflow.
-
Select the workflow and click OK.
-
Click OK.
-
Save the app.
You can now run the workflow in the host app.
See also...
Host and Run Workflows in ArcGIS Web AppBuilder
Configure a Geocortex Viewer for HTML5 Viewer
To configure a Geocortex Viewer for HTML5 viewer to run a workflow, you add a menu item, toolbar button, or hyperlink that runs the workflow using an HTML5 Viewer command. You may also have to enable VertiGIS Studio Workflow in Geocortex Essentials Manager, if it is not already enabled.
The following steps show you how to configure an I Want To menu item that runs the workflow.
Step 1: Add an I Want To Menu item
-
Edit the viewer in Geocortex Essentials Manager.
-
Click I Want To Menu in the side panel.
-
Add a new menu item.
-
In the Text box, type the menu item's text.
-
In the Command box, type RunWorkflowByUrl.
-
In the Command Parameter box, type or paste the workflow's URL.
You can get the URL from VertiGIS Studio Workflow Designer or from ArcGIS:
-
VertiGIS Studio Workflow Designer: In VertiGIS Studio Workflow Designer, open the workflow, click Info in the sidebar, and copy the URL from the URL box.
If there is no URL box in the Info panel, save the workflow. A workflow does not have a URL until it has been saved.
-
ArcGIS: In ArcGIS, go to your Content page and click the workflow to open its details. Copy the URL from your browser's address bar.
-
-
Click OK.
-
Click Apply Changes.
-
Click Save Site.
Step 2: Enable VertiGIS Studio Workflow
Viewers created in Geocortex Viewer for HTML52.9 or newer have VertiGIS Studio Workflow enabled by default.
-
Click Workflow 5 in Manager's side panel.
-
If it is not already selected, select the Enabled checkbox, click Apply Changes, and click Save Site.
See also...
Host and Run Workflows in the Geocortex Viewer for HTML5
Step 7: Run the Workflow in the Host Application
Test your workflow by running it in the host application with verbose logging turned on.
Follow the instructions to run the workflow in the host application:
If you get a permissions error when you run the workflow, make sure you have shared the workflow with Everyone (public) in ArcGIS, as described in Step 5: Share the Workflow.
Run the Workflow in the Web AppBuilder App
-
In Web AppBuilder, edit the app that hosts the workflow.
-
Press F12 to open the browser console.
-
If you use Chrome or Firefox, set the console's log level:
- Chrome: Make sure the Verbose level is selected.
- Firefox: In the Filter bar, make sure the Debug filter is selected.
In Edge, verbose logging appears in the console no matter which log levels you choose.
-
Click the widget in the Web AppBuilder editor to run the workflow.
If you run the workflow by clicking the Launch or Preview link in the editor, verbose logging will not appear in the console. To show verbose logging, you must run the workflow by clicking the widget within the Web AppBuilder editor.
The workflow runs and verbose log information appears in the console.
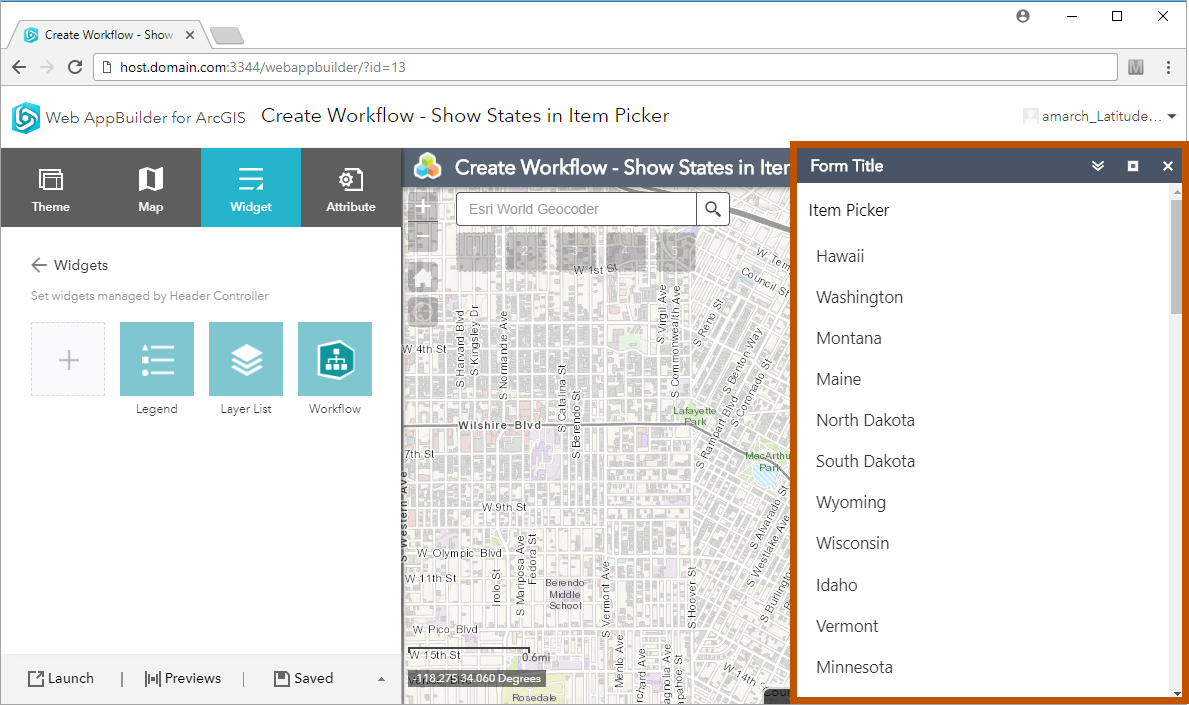
Workflow previewed in Web AppBuilder
-
Click Submit to allow the workflow to complete.
See also...
Use the Console to Debug Workflows
Run the Workflow in Geocortex Viewer for HTML5
-
Launch the viewer in your browser.
-
In the address bar, add the
dev=trueURL parameter to the viewer's URL.For example:
http://host.domain.com/Html5Viewer/index.html?viewer=myviewer.gvh&dev=trueThe
dev=trueURL parameter turns on verbose logging. -
Press Enter.
-
Press F12 to open the browser console.
-
If you use Chrome or Firefox, set the console's log level:
- Chrome: Make sure the Verbose level is selected.
- Firefox: In the Filter bar, make sure the Debug filter is selected.
In Edge, verbose logging appears in the console no matter which log levels you choose.
-
Select the I Want To menu item to run the workflow.
The workflow runs and verbose log information appears in the console.

Workflow running in the Geocortex Viewer for HTML5
-
Click Submit to allow the workflow to complete.
See also...