Button Bar Form Element
The Button Bar form element displays one or more buttons that the user can click to perform an action.
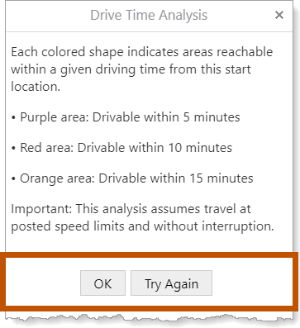
Example of a Button Bar form element with two buttons, shown in a viewer
Buttons are used to control form validation and submission. When you configure a button, you specify whether the button validates the user's input and/or submits (exits) the form. When the user clicks the button:
-
Validation: If the button's Causes Validation checkbox is selected, each form element that has validation configured is validated. If there are errors, the user is prompted to make corrections. When the user clicks the button again, the form is revalidated. The validation cycle is repeated until the form is free of errors.
-
Submission:
In either of the following scenarios, Causes Validation must be checked for a
submitsubworkflow to run.-
Value: If the button has a Value but not a click event, the
submitsubworkflow runs (if there is one) and the form is exited. The workflow continues running at the next activity following the Display Form activity.or
-
Click Event: If the Button Bar has a
clickevent, theclicksubworkflow runs. If theclicksubworkflow contains a Propagate Form Event activity, after theclickevent completes, thesubmitsubworkflow runs (if there is one) and the form is exited. The workflow continues running at the next activity following the Display Form activity.
-
Footer Button Bar
The most common use for the Button Bar form element is to submit or cancel the form. When you create a new form in Workflow Designer, the form has a Footer Button Bar with Submit and Cancel buttons. The Submit button validates the user's input and submits (exits) the form. The Cancel button submits the form without validating the user's input. For many forms, the default Footer Button Bar is all you need to handle form validation and submission.
Unlike Button Bars that you add to a form, the Footer Button Bar is always positioned at the very bottom of the form. You cannot delete the Footer Button Bar. If you do not want your form to have a footer, clear the Button Bar's Visible checkbox to hide the Button Bar.
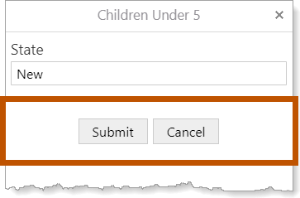
Footer Button Bar, shown in a viewer
Button Bar Properties
The Properties table describes the properties of the
The type of a property defines what types of values the property can have. Many properties are type string, which means that the property's value is text. Boolean properties can be true or false. Some properties have more than one possible type.
Property names in Workflow Designer's Properties panel are written using the capitalization and spacing of a title. Property names in expressions are valid JavaScript identifiers and start with a lower case letter.
In the table below:
- If a property can be accessed in both the Properties panel and expressions, then the table gives both versions of the name.
- If a property's name in the table starts with a lower case letter, then you can only access the property in expressions.
- If a property's name starts with a capital letter and the table does not give a name to use in expressions, then you can only access the property in the Properties panel.
Expressions are case sensitive. When you access a form element property in an expression, you must use the correct capitalization.
Properties of the Button Bar Form Element
|
Accessible Description |
|
Type: String Name in Properties Panel: Accessible Description Name to Use in Expressions: accessibleDescription An accessible version of the description of the element. The accesible description is not visible on the page; it is hidden. You can use the Accessible Description property to provide a description that can be used by assistive technologies, such as screen readers. |
|
Buttons |
|
Type: { [key: string]: Item; } Name in Properties Panel:
Name to Use in Expressions: items
The
${Display Form ID}.state.{Element ID}.items
For example: $form1.state.
For more information, see Form Element Items. |
|
Description |
|
Type: String Name in Properties Panel: Description Name to Use in Expressions: description A description of the element. The description appears below the element's title. You can use the Description property to describe what the element represents or to provide instructions to the user about how to use the element. You can format the description using Markdown. |
|
Element ID |
|
Type: String The element's ID, which is used in other form elements and activities to access the element's properties You cannot set the value of the Element ID property in an expression—you can only use the value that you configured for it. To use the Element ID property in an expression: ${Display Form ID}.state.{Element ID}.{property name} For example: $form1.state.
|
|
Enabled |
|
Type: Boolean Name in Properties Panel: Enabled Name to Use in Expressions: enabled Indicates whether the By default, To access the ${Display Form ID}.state.{Element ID}.enabled
For example: $form1.state.
|
|
error |
|
Type: String | MarkdownRef Indicates whether an error occurred in the element. We recommend using the Set Form Element Error and Clear Form Element Error activities to work with errors in form elements. |
|
styleName |
|
Type: String
Indicates the name of the style that will be applied to the element. To access the ${Display Form ID}.state.{Element ID}.styleName
For example: $form1.state.
|
|
Title |
|
Type: String Name in Properties Panel: Title Name to Use in Expressions: title The element's title, which appears at the top of the element.
You can format the title using Markdown. |
|
Title Location |
|
Type: String Name in Properties Panel: Title Location Name to Use in Expressions: titleLocation Specifies whether the element's title appears above (default) or beside the element. The value must be either |
|
type |
|
Type: String The variety of form element. Use the To access the ${Display Form ID}.state.{Element ID}.type For example: $form1.state.
|
|
Visible |
|
Type: Boolean Name in Properties Panel: Visible Name to Use in Expressions: visible Indicates whether the element is visible to the user. By default,
To access the ${Display Form ID}.state.{Element ID}.visible For example: $form1.state.
|
Button Bar Events
The following table describes the events associated with the
Events for the Button Bar Form Element
|
load |
|
The
You can use the |
|
click |
|
The You could use the By default, the built-in submit behavior does not work when the Button Bar has a |
|
submit |
|
The The |
Configure the Buttons in a Button Bar
As part of the configuration of
-
Manually: If you know exactly how many
-
Using a Subworkflow: If you want to base the
Configure Buttons Manually
If you know exactly how many
To manually configure
-
In the
-
Configure
-
Click the arrow
 to show the
 -
Label: In the Label box, type the text that you want to
-
Value: If you want the form to submit (exit) when the user clicks the button, enter a value that uniquely identifies this button.
If you do not want the form to submit when the button is clicked, leave the Value property blank or add a
clickevent with no Propagate Form Event activity.You can use the Value property to determine which button was selected. Make sure you use a different value for each button so you can test which button was clicked. Within the Button Bar's events, such as a
clickevent, you can find out which button was clicked using an expression similar to this:=$form1.event.valueLater in the workflow, you can find out which button caused the form to submit using the form's
resultoutput, for example:=$form1.resultYou can use any text for the button's value, for example,
Get Anotherand842are valid values.An easy way to configure the value is to repeat the label. For example, a Submit button could have
submitas its value and a Cancel button could havecancelas its value.If you plan to translate the workflow, you may prefer to use numbers as the values.
If you use digits for the values of the buttons in a Button Bar (for example, you could give the buttons values
1,2,3,...), remember that these are text, not numbers. When you check which button was clicked, you must compare to the text value ("1"), not the numeric value (1). For example, you could use an expression like this as the condition for an If activity the follows the Display Form activity:=$form1.result == "1" -
Default: Select the Default checkbox if you want this button to be selected in the event that the form is submitted automatically, for example, if the user presses Enter instead of clicking a button.
-
Causes Validation: Select the Causes Validation checkbox if you want the user's input validated when the user clicks the button. This validates the input in every form element that has validation configured.
-
-
Repeat the previous step
You can reorder the
-
Remove any unconfigured
To remove
to show the
Use a Subworkflow to Create Buttons
Workflow Designer provides a Blank template that you can use as the starting point for the subworkflow that creates buttons. Initially, the subworkflow has an Event block and nothing else in it. You will have to create the subworkflow from scratch.
To create the subworkflow, first build a list of form element items, and then use the Set Form Element Items activity to assign the items to the Button Bar.