Use the Item Picker Form Element for Visualization
You can use the Item Picker form element to display a filterable list of features and optionally allow the user to select one or more features. If you configure an Item Picker to allow selection, you can access the selection later in the workflow to perform additional processing. Alternatively, you can use an Item Picker strictly for display purposes. In either case, you can configure the Item Picker to display multiple lines of Markdown-formatted information about each feature, including feature attributes.
If the features listed by an Item Picker have geometries, they are highlighted on the map. The highlighting changes when the user clicks or hovers over a feature in the form.
Example - Display and Select Features
This example uses two Item Pickers, one which allows selection and one that is used for display only. The first Item Picker queries an ArcGIS layer for US states in a particular region and allows the user to select one of the states. The second Item Picker queries a different ArcGIS layer to get county information for the selected state, and then displays several Markdown-formatted attributes for each county.
Workflow Logic
The workflow has the following activities, in the order shown:
-
Display Form (
form1): Display a form that gets a US state from the user, and then displays the counties in the selected state.In addition to the header and footer elements, the form has the following elements;
-
Item Picker (
itemPicker1): Get the states in the Middle Atlantic region and zoom the map to the states. Display the state names in the form, with a radio button beside each name. -
Item Picker (
itemPicker2): When the user selects a state initemPicker1, get the counties in the selected state and zoom the map to the state. Format county attributes and display them in the form. -
Horizontal Rule: Separate the footer from the rest of the form.
-
To use the Item Picker form element to show query results and allow the user to select a result:
-
Open Workflow Designer.
-
In a new, blank workflow, add and connect the following activity:
- Display Form
-
Double-click the Display Form activity to edit it.
-
Create the following form:
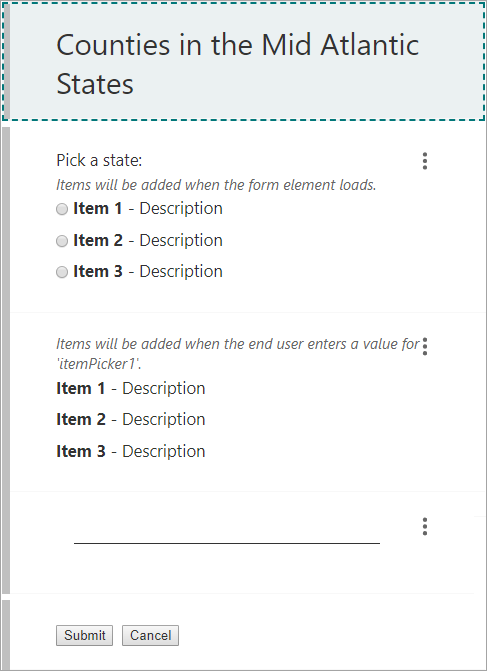
To configure the form:
- Select the Form Title element in the form preview and set its Title property to:
Counties in the Mid Atlantic States -
Item Picker (
itemPicker1): Add an Item Picker form element and configure it as follows:-
Configure the element's properties:
-
Set the Title property to:
Pick a state: -
Set the Filter Hint Text property to:
US States in the Mid Atlantic Region -
Make sure Selection Mode is set to:
SingleThis puts a radio button beside each state so the user can select a state.
-
-
In the Items area, click ArcGIS Query.
The ArcGIS Query subworkflow opens.
-
Query Layer (
query1): Configure the Query Layer activity's inputs:-
Set the Where input to:
SUB_REGION='Middle Atlantic' -
Set the Return Geometry input to:
true -
Set the Output Spatial Reference input to:
102100 -
Set the Output Fields input to:
STATE_NAME
-
-
Set the Get Form Element Items From Features activity's Label input to:
STATE_NAME -
Set Map Extent: Add a Set Map Extent activity to the bottom of the subworkflow and connect the Set Form Element Items activity to it. Configure its inputs:
-
Set the Scale input to 10 million:
10000000 -
Set the Features input to:
=$query1.features
-
-
Click Display Form in the breadcrumbs to return to the form preview.
-
-
Item Picker (
itemPicker2): Add another Item Picker form element and configure it as follows:-
Configure the element's properties:
-
Set the Depends On property to:
itemPicker1This populates the Item Picker when the user selects a state in the previous Item Picker.
-
Set the Selection Mode property to:
NoneThe user will not be able to select features displayed by the Item Picker.
-
-
In the Items area, click ArcGIS Query.
The ArcGIS Query subworkflow opens.
-
Query Layer (
query2): Configure the Query Layer activity's inputs:-
Set the Url input to:
https://sampleserver6.arcgisonline.com/arcgis/rest/services/Census/MapServer/2 -
Set the Where input to:
=`STATE_NAME='${$form1.state.itemPicker1.value.items[0].value.data.attributes.STATE_NAME}'`This input uses a template literal. For information on template literals, see String Expressions.
The
dataproperty provides access to the item's underlying feature. -
Set the Return Geometry input to:
true -
Set the Output Spatial Reference input to:
102100 -
Set the Output Fields input to:
NAME, SQMI, POP2007
-
-
Set the Get Form Element Items From Features activity's Label input to:
### {NAME}Area: *{SQMI} sq mi*\Population: *{POP2007}* -
Set Map Extent: Add a Set Map Extent activity to the bottom of the subworkflow and connect the Set Form Element Items activity to it. Configure its inputs:
-
Set the Scale input to 5 million:
5000000 -
Set the Features input to:
=$query2.features
-
-
Click Display Form in the breadcrumbs to return to the form preview.
-
-
Add a Horizontal Rule form element between the second Item Picker and the footer.
- Select the Form Title element in the form preview and set its Title property to:
-
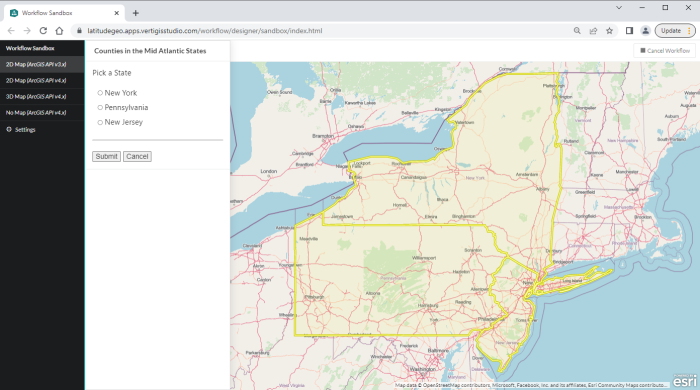
Run the workflow in the Sandbox. Do not use the No Map environment.
The form loads and displays the first Item Picker, which displays a list of states in the Middle Atlantic region, with a radio button beside each state. The map zooms to the Middle Atlantic states and highlights them on the map.
-
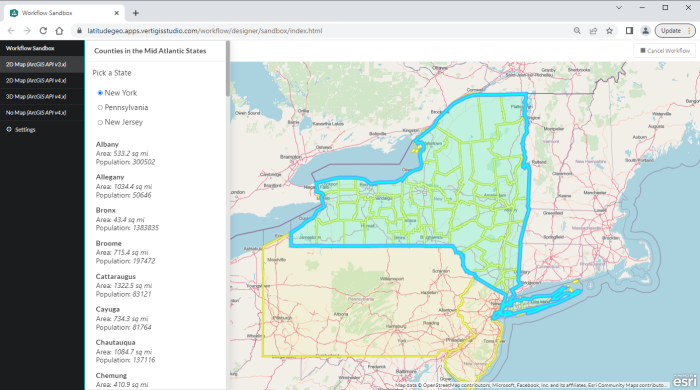
Select New York in the form.
The second Item Picker loads and displays a formatted list of the counties in New York. The map zooms to New York and changes the highlighting to indicate that New York is selected in the form. New York's counties are also highlighted on the map. If you hover the pointer over a county in the form, the county's highlighting changes on the map.
-
Select Pennsylvania in the form.
New York's counties will be replaced with Pennsylvania's counties in the form and on the map.
-
Press Ctrl+S to save the workflow.