Host and Run Workflows in VertiGIS Studio Web
There are several ways to host a workflow in
The most common method is the I Want To menu. Host and Run your First Workflow shows how to configure an I Want To menu item to run a simple workflow.
The method that you use to host a workflow depends in part on whether the workflow takes inputs, and if it does, what type of inputs—design-time or run-time. See Host and Run an Existing Workflow with Design-Time Inputs and Host and Run a New Workflow with a Run-Time Input for information.
You can create workflows in
See also...
Add a Workflow to an App in the VertiGIS Studio Web documentation
Host and Run your First Workflow
There are several ways to host a workflow in
The procedure assumes that the I Want To Menu component is already in your application's layout. If not,
To use the I Want To menu to host and run an existing workflow with no inputs:
Step 1: Configure the menu item
-
Edit the I Want To Menu component.
-
Click Add Menu Item.
-
Click the Workflows tab.
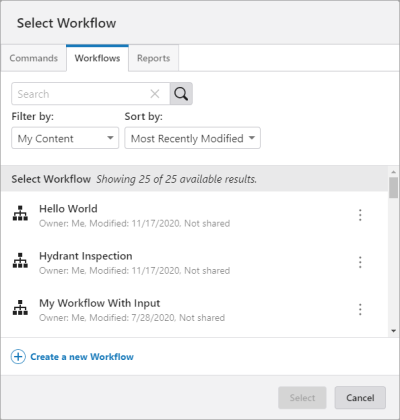
Select Workflow window
-
Find the workflow you want to add.
By default, the Select Workflow window lists workflows with items in your ArcGIS My Content area, sorted by most recently modified. The Select Workflow window has Search, Filter, and Sort functions to help you find workflows:
-
Search: To search for a workflow, type one or more words into the Search box and click the Search button
 or press Enter. The Search function searches the titles, summaries, and descriptions of workflow items in ArcGIS.
The workflow's title in Workflow Designer is the same as the item's title in ArcGIS. Similarly, the workflow's description on the Info panel in Designer is the same as the item's description in ArcGIS.
-
Filter: There are several options to filter the list of workflows. My Content, Shared With Me, and Public correspond to how the workflow's item is shared in ArcGIS. The Favorites option lists workflows whose items you have added to your Favorites
 in ArcGIS.
 -
Sort: There are several options to sort the list of workflows—Most Recently Modified, Least Recently Modified, Title, and Owner.
-
-
Select the workflow in the list and click Select.
A menu item is added for the workflow.

Menu item to run the City Street Search workflow
To configure a menu item's settings, open the item
 . For information, see
 -
Save the application.
Step 2: Run the workflow
-
Run the application.
-
Click I want to and select the item to run the workflow.
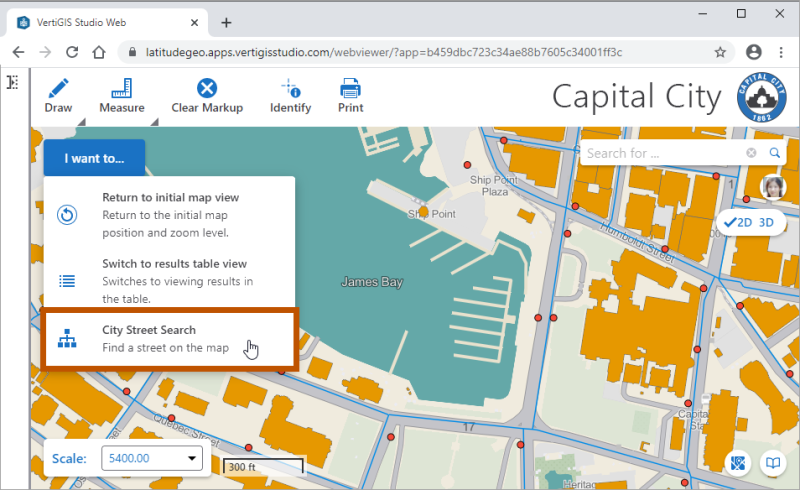
Select the menu item to run the workflow
The workflow runs.
Workflow running in a VertiGIS Studio Web application
Recommended Hosting Methods
VertiGIS Studio Web offers several methods to host and run workflows:
- I Want To menu
- Toolbar
- Feature Actions menus
- Context menu
The recommended hosting method depends on where you want the button or menu item to appear in the user interface and on the Workflow Inputs that the workflow takes. Workflow inputs are values that the host application passes to the workflow for the workflow to operate on. Design-time inputs are values that you know in advance and configure in the host application. Run-time inputs are selected by the user when the workflow runs, like a feature or a map location.
The following recommendations prevent the situation in which the user has to select a feature or map location to run a workflow that doesn't require it:
-
No Inputs: If the workflow does not take inputs, use the I Want To menu
-
Design-Time Inputs Only: If the workflow takes design-time inputs but not run-time inputs, use the I Want To menu
-
Run-Time Inputs: If the workflow takes run-time inputs and possibly also design-time inputs, use
-
Feature Actions Menu: Feature Actions menus pass the features selected or identified by the user. Feature Actions menus can also pass design-time inputs.
-
Context Menu: The Context menu passes the map location (point geometry) that the user right-clicked to open the Context menu. The Context menu can also pass design-time inputs.
The I Want To menu
-
Workflow Templates
You can configure a VertiGIS Studio Web application to host a workflow before you have created the workflow. This is useful if, in the process of configuring your application, you realize that you want to add some functionality to your application using a workflow. In this case, you can create the workflow when you configure the menu item to run the workflow. If you want, you can later modify the workflow in Workflow Designer to adapt or extend it. When you create a workflow from VertiGIS Studio Web, the workflow's host application is set to VertiGIS Studio Web on the Deployment panel.
See also...
Create Workflows in VertiGIS Studio Web
Host and Run a Workflow with Design-Time Inputs
Configure Design-Time Inputs
The way that you configure design-time inputs in a VertiGIS Studio Web application is the same for all components—Result Details, Result List, Map, and so on. When you configure an item to run a workflow, there is an Input Arguments box where you define the inputs. Initially the box is empty except for a pair of brace brackets.
The syntax to configure an input is JSON (JavaScript Object Notation): "name": "value". The name must be the same as the name that the workflow uses for the input in an expression like =$getWorkflowInputs.inputs["name"]. If value is a number, you can omit the quotation marks around the value. There must be commas between inputs.

Input Arguments box with no inputs defined ( ), one design-time input (
 ), and three design-time inputs (
 )
)
Host and Run an Existing Workflow with Design-Time Inputs
To host and run a workflow with design-time inputs:
Step 1: Configure the menu item
-
In Web Designer, open the component you want to use.
You can use an I Want To menu or
-
Click Add Menu Item.
-
On the Workflows tab, select the workflow that you want to add and click Select.
The item is added to the list of menu items.
-
Open the menu item.
-
In the Input Arguments box, type the input names and values between the brace brackets following the syntax
"name": "value". Put commas between the inputs.For example, a workflow that takes two design-time inputs called
distanceandunitscould be configured as follows:{ "distance": 30, "units": "meters" }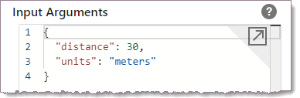
Design-time inputs configured in a host application
-
Optionally configure any other settings you want. For information, see
-
Save the application.
Step 2: Run the workflow
-
Launch the application.
-
Run the workflow by clicking the workflow in the menu.
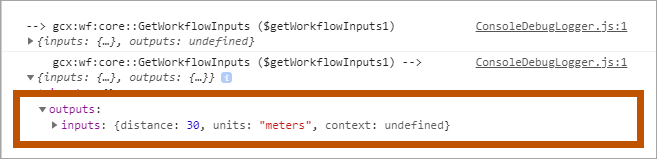
When you create a workflow, you may want to verify that the workflow correctly receives the inputs. To do this, you could temporarily add a Log or Alert activity with an expression similar to the following:
="Buffer Distance = " + $getWorkflowInputs1.inputs.distance + " " + $getWorkflowInputs1.inputs.units

Example alert showing the workflow's inputs
Alternatively, you could view the verbose log.
Host and Run a Workflow that Takes a Run-Time Input
Predefined "context" Input
Unlike design-time inputs, you do not need to configure run-time inputs in the host application. VertiGIS Studio Web has a predefined run-time input called context that you can use to pass the current features
The context input works with different input types. If you configure a feature action to run a workflow, then $getWorkflowInputs1.inputs.context will contain an array of features (the current feature set). If you configure a Map Context menu to run a workflow, then $getWorkflowInputs1.inputs.context will contain a point geometry (the location on the map that the user right-clicked). For information about types for different menus, see the Component Menu Types and Contexts table in the VertiGIS Studio Web documentation.
Host and Run a New Workflow with a Run-Time Input
The following procedure creates a workflow from a template and configures a feature action to run the workflow.
To create, host, and run a workflow that takes a run-time input:
Step 1: Configure the menu item
-
In Web Designer, open the component you want to use, for example, the Results Details component.
You can use any component with a Feature Actions menu.
-
Click Add Menu Item.
-
Select the Workflows tab.
-
Click Create a New Workflow.
-
Select a template from the Select a Workflow Template drop-down list, for example, the Feature - Get Feature Attributes template.
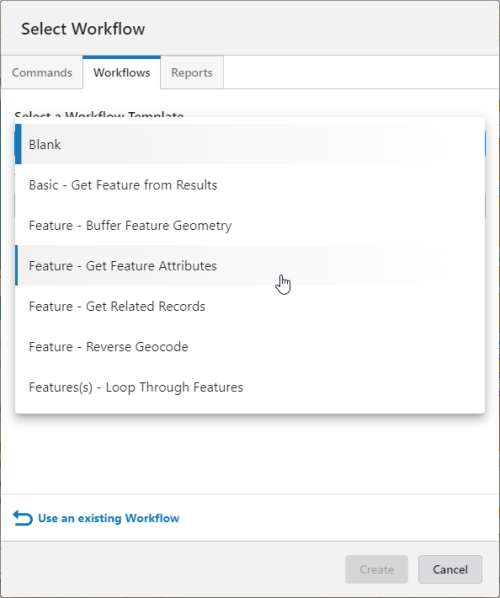
Select a template
-
Enter a title for the workflow, for example, Get Feature Attributes.
-
Click Create.
The workflow is created and saved and the menu item is added to the list.
-
Optionally configure any other settings you want. For information, see
-
Save the application.
To open the workflow in Workflow Designer, open the menu item in Web Designer and click Open in VertiGIS Studio Workflow.
Step 2: Run the workflow
-
Launch the application.
-
Click a feature.
The Feature Details display.
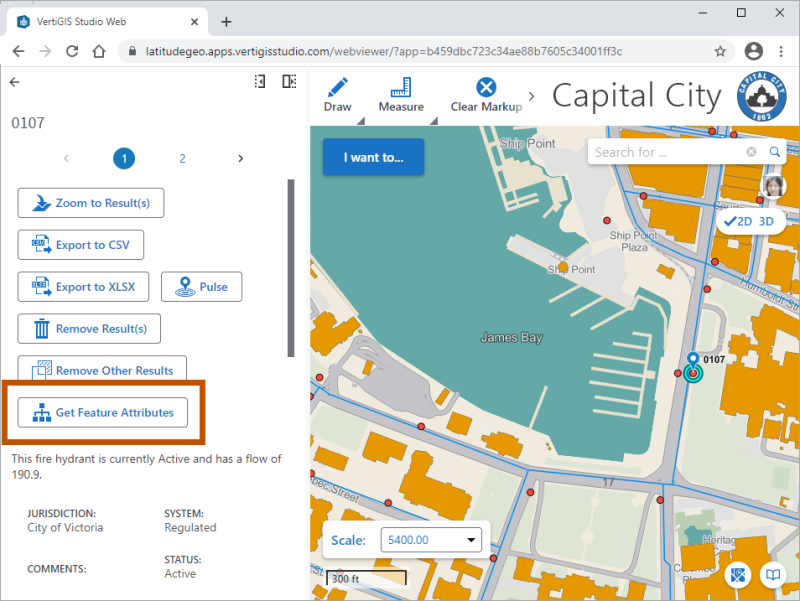
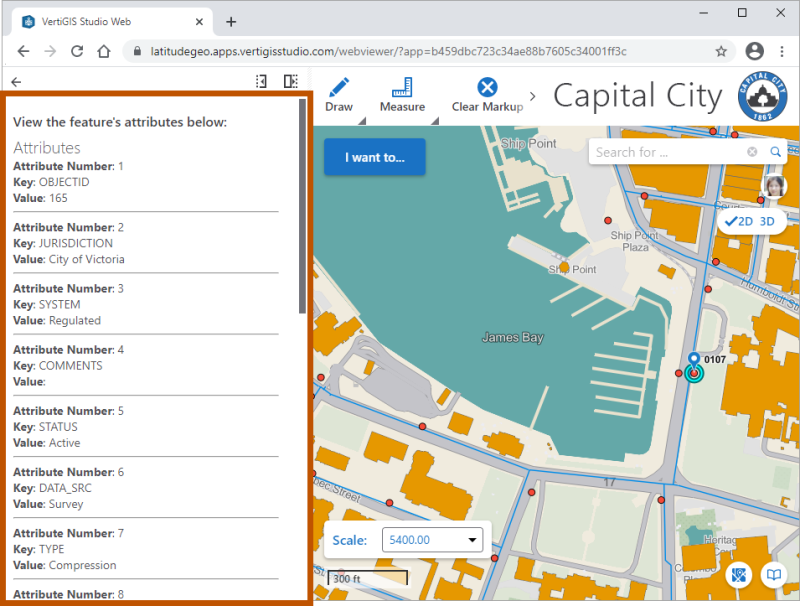
Feature details showing the feature action to run the workflow
-
Click the workflow in the Feature Actions menu.
The workflow runs.
Feature attributes displayed by the workflow