Install VertiGIS Studio Workflow in a Load-Balanced Environment
A typical on-premises VertiGIS Studio Workflow deployment consists of one server that hosts both the Workflow software and its data directory. This deployment case is suitable for most installations and can be installed and updated out of the box.
Alternatively, you may prefer to install VertiGIS Studio Workflow in a multi-server environment.
In a multi-server VertiGIS Studio Workflow deployment, each server operates independently to run server workflows. This means that users can still run server workflows if one server fails.
All servers share a single copy of the VertiGIS Studio Workflow data directory. You need to set up a redundant file share for the data directory. This provides redundancy for files related to your Workflow installation, such as configuration files and server workflows.
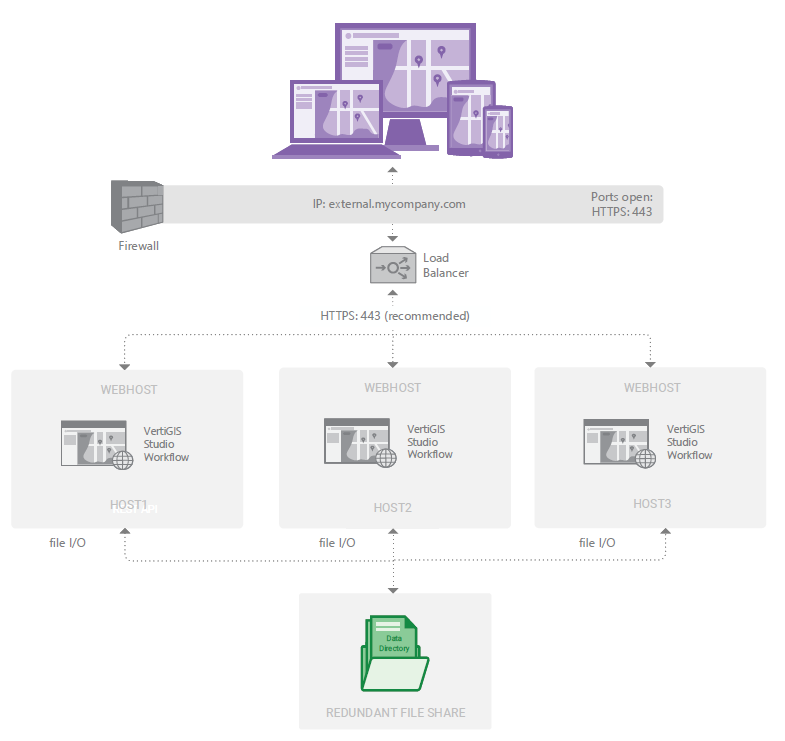
A redundant multi-server deployment of VertiGIS Studio Workflow
Before you Begin
To run VertiGIS Studio Workflow in a load-balanced environment, ensure the following requirements are met:
-
You have a load balancer.
-
Your load balancer does not rewrite URL paths.
-
You have enabled sticky sessions on the load balancer.
Sticky sessions (also known as "session affinity" or "session persistence") must be enabled on the load balancer. When sticky sessions are enabled, all requests from a client are routed to the same server for the duration of that client's session.
Main Steps
The main installation steps for a load-balanced deployment of VertiGIS Studio Workflow are the same as for a typical on-premises deployment, with some exceptions and additional steps, which are described below.
The installation steps are as follows:
-
On each server, install VertiGIS Studio Workflow. Follow the installation steps for a typical installation.
-
On each server, configure the post-installation settings. Follow the post-installation steps for a typical installation, with the exception of the Data and Portal sections:
Set Up the File Share
Set up a redundant file share for the data directory. The file share will be shared between all servers, providing redundancy for the files related to your Workflow installation.
To set up the file share:
-
Find your existing file share, or create a new one.
We recommend that you choose a permanent location for the data directory file share now. If you decide to change the data directory location later, follow the instructions in Move the Data Directory so you do not lose access to your existing workflows.
-
Within the file share, create a folder for the VertiGIS Studio Workflow data.
-
Assign the VertiGISStudioWorkflow application pool user Read / Write permissions. Typically this is the DomainName\MachineName$ user.
Configure Post-Installation Settings
The Data panel allows you to select a location for VertiGIS Studio Workflow to store Workflow-related files, such as configuration files and server workflows.
-
Click Browse and select the file share folder location.
The Portal panel allows you to register VertiGIS Studio Workflow with Portal for ArcGIS or ArcGIS Online.
Follow the Portal instructions for a typical installation, with the exception of the Redirect URL.
-
Set the Redirect URL to use the public address of your load balancer.
Configure the Load Balancer
-
Configure your load balancer to direct traffic to the servers on which VertiGIS Studio Workflow is installed.
Sticky sessions (also known as "session affinity" or "session persistence") must be enabled on the load balancer. When sticky sessions are enabled, all requests from a client are routed to the same server for the duration of that client's session.