Configure a Data Source
Configuring a data source in Report Designer provides VertiGIS Studio Reporting with the information it needs to connect to the data source and query it for data to include in the report. You only need to configure a data source once. You can then use it in any report that you author.
To configure a data source, you first specify the type of data source, for example, ArcGIS, JSON, SQL Server, Oracle, and so on. This is the provider. You then configure the individual connection settings that are required by that data source. VertiGIS Studio Reporting builds a connection string from the settings that you configure. When a user runs a report, VertiGIS Studio Reporting uses the connection string to initiate a connection with the data source. For more information regarding data source parameters, see Data Source Parameters.
You must know in advance what information is required to connect to a particular data source. If you aren't sure, ask the data source's administrator or refer to a resource like The Connection Strings Reference.
Reporting supports three types of data source out of the box—ArcGIS, JSON, and SQL Server. These providers work in both on-premises Reporting and cloud Reporting. You can use a wide variety of other providers with on-premises Reporting by installing the provider's driver on your server.
To add a data source, click Data Sources | Add Data Source. You are presented with a list of providers to select from. The list contains the three out-of-the-box providers, ArcGIS, JSON, and SQL Server. In on-premises Reporting, additional providers may be listed if Report Designer finds an installed driver for the provider. The Other option allows you to configure the connection information for providers that do not appear in the list.
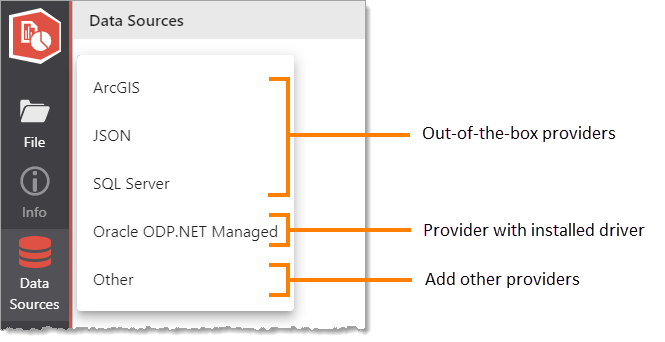
List of providers, showing one provider for which a driver is installed
VertiGIS Studio Reporting cannot query database tables that have multiple periods in the table name, for example, dbo.table.name.
VertiGIS Studio Reporting can query ArcGIS data source tables that have multiple periods in the name.
For instructions on how to configure the connection information for a specific provider, see:
Configure an ArcGIS Data Source
VertiGIS Studio Reporting supports ArcGIS map services and feature services as data sources.
On-premises and Cloud Reporting require ArcGIS Server data sources to be from version 10.3 or above.
To configure the connection information for an ArcGIS service, you must configure the service's URL. If the service is secured, you may have to configure a user name and password as well, depending on what type of security is used:
-
Federated Security: If the service is federated with Portal for ArcGIS, you do not need to configure a user name and password. VertiGIS Studio Reporting uses the end user's ArcGIS identity to access federated services.
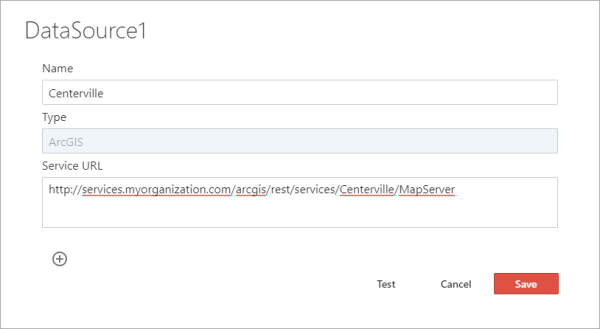
Example configuration for a federated map service
-
ArcGIS Online-Hosted Feature Services: If the service is hosted by ArcGIS Online, then you do not need to configure a user name and password. VertiGIS Studio Reporting uses the end user's ArcGIS identity to access hosted services.

-
Web-Tier Security: If the service is secured using web-tier security, you must configure the Web Username and Web Password settings. Use the Add Parameter
 function to add the settings.
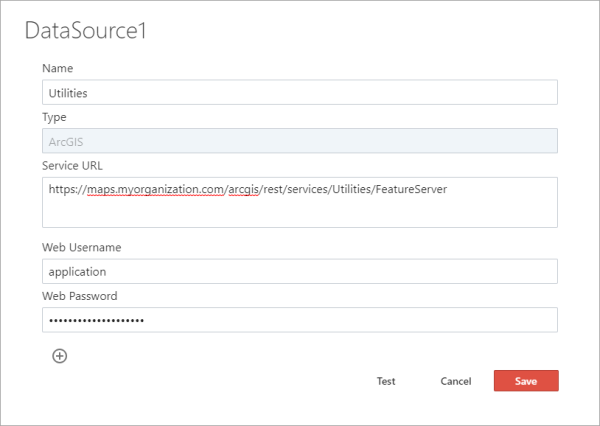
Example configuration for a feature service that is secured using web-tier security
-
Token-Based Security: If the service is secured using token-based security, you must configure the Token Username and Token Password settings. Use the Add Parameter
function to add the settings.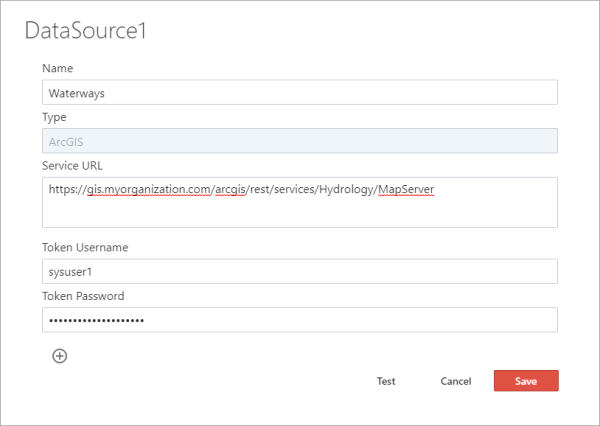
Example configuration for a map service that is secured using token-based security
There are two ways to configure an ArcGIS data source:
-
Data Sources panel: This is the general method to configure data sources.
-
Layer Report: The Layer Report template creates a report that is bound to an ArcGIS data source and takes a list of feature IDs as input. The template has a Use a new ArcGIS layer or table option that provides a step to configure the service's URL.
If the connection requires additional settings, for example a user name and password, you cannot use the Use a new ArcGIS layer or table option. You must configure the data source in the Data Sources panel before using the template to create a new report. You can then use the template's Use an existing data source option to create a layer report that is bound to the data source.
To open the template, click File | New | Layer Report.
To configure an ArcGIS data source using the Data Sources panel:
-
In Report Designer's sidebar, click Data Sources.

-
Click Add Data Source and select ArcGIS.
You can also configure an ArcGIS data source from scratch using the Other option.
-
In the Name box, type a name for the data source.
Choose a meaningful name. If you change the name after you have added the data source to one or more reports, the data source will be removed from those reports. You will have to add back the data source under its new name and reconfigure it in each report.
-
In the Service URL box, type or paste the URL for the map service or feature service.
For example:
http://maps.mydomain.com/arcgis/rest/services/LocalMap/MapServer
https://services.myorg.com/arcgis/rest/services/Utilities/FeatureServer
This is the URL for a service, not a layer. You will specify the layers later, when you add the data source to the report.
Support for ArcGIS Server FeatureServer endpoints on versions 10.5 and lower is limited. For ease of use, create data sources using the MapServer endpoint.
-
If the service is secured using web-tier or token-based security:
-
Web-Tier Security:
-
Click Add Parameter
and select Web Username to add the setting to the panel. -
Type the user name in the Web Username box.
-
Click Add Parameter
and select Web Password to add the setting to the panel. -
Type the password in the Web Password box.
-
-
Token-Based Security:
-
Click Add Parameter
and select Token Username to add the setting to the panel. -
Type the user name in the Token Username box.
-
Click Add Parameter
and select Token Password to add the setting to the panel. -
Type the password in the Token Password box.
-
If you ever need to change the password for an existing data source, you must type the full password. Editing selected characters in the existing password will fail.
-
-
If you need to configure additional settings:
-
Click Add Parameter
, select Other, type the name of the setting, and click OK.The setting is added to the panel.
Use the setting name defined by the provider. This ensures that the provider will recognize the setting. Refer to the provider's documentation for information.
-
Configure the setting.
-
Repeat these steps for each additional setting.
-
-
Click Test to test the connection.
If the test fails, verify the information you have configured and make corrections as needed.
Make sure you have specified the URL to the service, not to a specific layer.
-
Click Save.
The data source is listed on the Data Sources panel.
-
Click away from the Data Sources panel to close the panel.
Configure a JSON Data Source
VertiGIS Studio Reporting supports JSON data sources. Using JSON allows you to dynamically generate data in a client application and use this data in a report.
To configure a JSON data source:
-
In Report Designer's sidebar, click Data Sources.
-
Click Add Data Source and select JSON.
-
In the Name box, type a name for the data source.
Choose a meaningful name. If you change the name after you have added the data source to one or more reports, the data source will be removed from those reports. You will have to add back the data source under its new name and reconfigure it in each report.
-
In the JSON box, type or paste the JSON that is a representative sample of the expected JSON that client applications will supply.
-
Click Test to validate the JSON.
If the test fails, verify the information you have configured and make corrections as needed.
-
Click Save.
The data source is listed on the Data Sources panel.
-
Click away from the Data Sources panel to close the panel.
Configure a SQL Server Data Source
To configure a SQL Server data source:
-
In Report Designer's sidebar, click Data Sources.
-
Click Add Data Source and select SQL Server.
You can also configure a SQL Server data source from scratch using the Other option.
-
In the Name box, type a name for the data source.
Choose a meaningful name. If you change the name after you have added the data source to one or more reports, the data source will be removed from those reports. You will have to add back the data source under its new name and reconfigure it in each report.
-
In the Data Source box, type the location of the server, for example,
localhost.DataSource will always be used, as it points to the location of the SQL instance, either by common name or IP address.
-
In the Initial Catalog box, type the name of the database.
-
Type the user ID in the User Id box.
-
Type the password in the Password box.
If you ever need to change the password for an existing data source, you must type the full password. Editing selected characters in the existing password will fail.
-
If you need to configure additional settings that don't appear in the panel:
-
Click Add Parameter
. -
If the setting that you want to configure appears in the list, select the setting. This adds the setting to the panel.
If the desired setting does not appear in the list, select Other, type the name of the setting, and click OK to add the setting to the panel.
Use the setting name defined by the provider. This ensures that the provider will recognize the setting. Refer to the provider's documentation for information.
-
Configure the setting.
-
Repeat these steps for each additional setting.
-
-
Click Test to test the connection.
If the test fails, verify the information you have configured and make corrections as needed.
-
Click Save.
The data source is listed on the Data Sources panel.
-
Click away from the Data Sources panel to close the panel.
Configure Other Types of Relational Databases
Besides the out-of-the-box providers (ArcGIS, SQL Server, and JSON), VertiGIS Studio Reporting supports many other providers, such as MySQL, PostgreSQL, Oracle, Oracle ODP.NET, and Oracle ODP.NET Managed.
To use other providers with VertiGIS Studio Reporting, you must install drivers for the providers. Because they require you to install a driver, other providers are only available for on-premises Reporting.
When you configure a data source in Report Designer, Report Designer detects which drivers are installed and lists those providers in the drop-down list. In this case, you can select the provider from the list to configure its connection information. If the provider is not listed, select the Other option.
To configure the connection information for a provider:
-
In Report Designer's sidebar, click Data Sources.
-
Click Add Data Source and select the type of data source. If the desired type is not listed, select Other.
-
In the Name box, type a name for the data source.
Choose a meaningful name. If you change the name after you have added the data source to one or more reports, the data source will be removed from those reports. You will have to add back the data source under its new name and reconfigure it in each report.
-
Configure the XpoProvider setting.
The XpoProvider setting specifies the provider, for example, Oracle, Postgres, or MySQL. To find out the value to enter, see Connection Information for Selected Providers.
-
Configure the settings that are needed to connect to the data source.
Some settings may already appear in the panel, ready to configure. You can also add settings to the panel as follows:
-
Click Add Parameter
. -
If the setting that you want to configure appears in the list, select the setting. This adds the setting to the panel.
If the setting does not appear in the list, select Other, type the name of the setting, and click OK to add the setting to the panel.
Use the setting name defined by the provider. This ensures that the provider will recognize the setting. Refer to the provider's documentation for information.
-
Configure the setting.
-
Repeat these steps for each setting that does not appear in the panel.
-
-
Click Test to test the connection.
If the test fails, verify the information you have configured and make corrections as needed.
-
Click Save.
-
Click away from the Data Sources panel to close the panel.
Connection Information for Selected Providers
The following table provides examples of connections for different providers. In the examples, the configured settings and their values are represented as setting Name:
Connections for Selected Providers
|
Access |
|
To use this provider with an on-premises installation of VertiGIS Studio Reporting, you must install a driver. This provider is not available in VertiGIS Studio Reporting in the cloud. Jet: Example configuration:
ACE: Example configuration:
|
|
Advantage |
|
To use this provider with an on-premises installation of VertiGIS Studio Reporting, you must install a driver. This provider is not available in VertiGIS Studio Reporting in the cloud. Example configuration:
|
|
ArcGIS |
|
This provider is available out of the box in both VertiGIS Studio Reporting in the cloud and on premises. To configure an ArcGIS connection, click Add Data Source, select ArcGIS, and configure the settings that the data source requires, for example:
To configure an ArcGIS data source from scratch, click Add Data Source, select Other, and set the XpoProvider setting to
|
|
Asa |
|
To use this provider with an on-premises installation of VertiGIS Studio Reporting, you must install a driver. This provider is not available in VertiGIS Studio Reporting in the cloud. Example configuration:
|
|
Ase |
|
To use this provider with an on-premises installation of VertiGIS Studio Reporting, you must install a driver. This provider is not available in VertiGIS Studio Reporting in the cloud. Example configuration:
|
|
DB2 |
|
To use this provider with an on-premises installation of VertiGIS Studio Reporting, you must install a driver. This provider is not available in VertiGIS Studio Reporting in the cloud. Example configuration:
|
|
Firebird |
|
To use this provider with an on-premises installation of VertiGIS Studio Reporting, you must install a driver. This provider is not available in VertiGIS Studio Reporting in the cloud. Example configuration:
|
|
MySQL |
|
To use this provider with an on-premises installation of VertiGIS Studio Reporting, you must install a driver. This provider is not available in VertiGIS Studio Reporting in the cloud. Example configuration:
|
|
Oracle |
|
To use this provider with an on-premises installation of VertiGIS Studio Reporting, you must install a driver. This provider is not available in VertiGIS Studio Reporting in the cloud. Example configuration:
|
|
Oracle ODP.NET |
|
To use this provider with an on-premises installation of VertiGIS Studio Reporting, you must install a driver. This provider is not available in VertiGIS Studio Reporting in the cloud. Example configuration:
|
|
Oracle ODP.NET Managed |
|
To use this provider with an on-premises installation of VertiGIS Studio Reporting, you must install a driver. This provider is not available in VertiGIS Studio Reporting in the cloud. Example configuration:
|
|
Pervasive SQL |
|
To use this provider with an on-premises installation of VertiGIS Studio Reporting, you must install a driver. This provider is not available in VertiGIS Studio Reporting in the cloud. Example configuration:
|
|
PostgreSQL |
|
To use this provider with an on-premises installation of VertiGIS Studio Reporting, you must install a driver. This provider is not available in VertiGIS Studio Reporting in the cloud. Example configuration:
|
|
SQLite |
|
To use this provider with an on-premises installation of VertiGIS Studio Reporting, you must install a driver. This provider is not available in VertiGIS Studio Reporting in the cloud. Example configuration:
|
|
SQL Server |
|
This provider is available out of the box in both VertiGIS Studio Reporting in the cloud and on premises. To configure a SQL Server connection, click Add Data Source, select SQL Server, and configure the settings that the data source requires, for example:
To configure a SQL Server connection from scratch, click Add Data Source, select Other, and set the XpoProvider setting to |
|
SQL Server CE |
|
To use this provider with an on-premises installation of VertiGIS Studio Reporting, you must install a driver. This provider is not available in VertiGIS Studio Reporting in the cloud. Example configuration:
|
|
VistaDB |
|
To use this provider with an on-premises installation of VertiGIS Studio Reporting, you must install a driver. This provider is not available in VertiGIS Studio Reporting in the cloud. Example configuration:
|
|
VistaDB5 |
|
To use this provider with an on-premises installation of VertiGIS Studio Reporting, you must install a driver. This provider is not available in VertiGIS Studio Reporting in the cloud. Example configuration:
|
Modify a Data Source's Connection Information
Changing the connection information for a data source changes it for every report that uses the data source.
For instructions on changing a single report to use a different data source, see Modify a Report to Use a Different Data Source.
To modify a data source's connection information:
-
In Report Designer's sidebar, click Data Sources.
-
Click the data source that you want to modify.
Alternatively, click
 beside the data source and select Edit.
 -
Modify the data source as desired.
To remove a setting, delete the setting's value.
-
Click Test to test the connection.
-
Click Save.
Remove Connection Settings
If you need to change the connection information for an existing data source, you may have to remove connection settings that no longer need to be configured. Report Designer does not provide a function to remove existing settings. Instead, delete the value of the setting and save the connection information. The next time you open the data source in the Data Sources panel, the setting will be gone.
To remove a setting from an existing connection:
-
In the Data Sources panel, select the data source.
The data source's settings show.
-
Delete the value from the setting that you want to remove.
-
Click Save.
-
Click away from the Data Source panel to close the panel.
-
To verify that the setting has been removed, re-open the Data Sources panel and select the data source.
Delete a Data Source
If you delete a data source that is used by one or more reports, the reports will no longer work. They will not be able to connect to the data source.
To delete a data source:
-
In Report Designer's sidebar, click Data Sources.
-
Click
beside the data source that you want to delete. -
Click Delete.
You will be prompted to confirm.
-
Click OK.
The data source is removed from the Data Sources panel.