Configure Report Navigation
To allow a user to navigate the components of a report with the click of a button, you must create a document map. A document map consists of a series of bookmarked report components, typically headings, that are organized in a hierarchical format. This map of the document allows users to see the organization of a report and quickly navigate to a particular component. These document maps are particularly helpful for navigating long and complex reports. The document map can be accessed through the bookmarks feature in any program used to view PDF documents. Optionally, you can also make your document map visible in a Table of Contents Control .
The following tutorial makes use of the navigation properties available in the Label Control, however navigation properties are included in a number of controls. For more information on the navigation properties available with each control, see the Control Reference.
Step 1: Create the report
- In VertiGIS Studio Report Designer, click File and then New.
- Double-click the Layer Report option.
- In the Layer Report Wizard dialog, select Use a new ArcGIS layer or table and then click Next.
- Enter a name for the data source, such as
World Time Zones. - For the URL, enter
https://sampleserver5.arcgisonline.com/arcgis/rest/services/WorldTimeZones/MapServer, and then click Next. - Select the World Cities layer and then click Finish.
Step 2: Set the report to run on 100 features
To create a report that requires navigation, we must run the preview on many features. As it is unreasonable to manually enter 100 OBJECTIDs into the report parameter, we will modify the query to automatically query the first 100 features.
- Open the Field List
 .
. - Expand the data source and then select the query.
- Click Edit query
 .
. - In the Data Source Wizard, click Run Query Builder...
- In the top right corner of the Query Builder dialog, expand Query Properties.
- Delete the contents of the Filter property.
- Set the Select Top property to
100. - Click OK and then Finish.
- Open the Field List and expand Parameters.
- Delete the FeatureIds parameter.
- Click the Preview
 button to test your configuration.
Step 3: Configure Group Header bands with data
- Add three group header bands
 to the report.
 -
Select the table that contains the table headers.
You can select the whole table by opening the Report Items List and selecting the table from the list of items.
- Drag the table into GroupHeader1.
-
Configure GroupHeader2 with a Label control populated by the POP_CLASS field.
- Open the Field List .
- Expand the data source and the query.
-
Drag the POP_CLASS field into GroupHeader2.
A Label control appears, configured with the POP_CLASS field.
- Open the Properties
 panel and then expand the Layout property group.
 - Set Height to
50and Width to250. - Expand the Appearance property group.
- Expand the Font property group and then set Size to
15. - Select the Italics option.
- Set Text Alignment to Middle Left.
-
Configure GroupHeader3 with a Label control populated by the CNTRY_NAME field.
- Open the Field List and drag CNTRY_NAME into GroupHeader3.
- In the Properties panel, set the Height to
50and Width to250. - Set the Font Size to
20. - Set the Text Alignment to Middle Left.
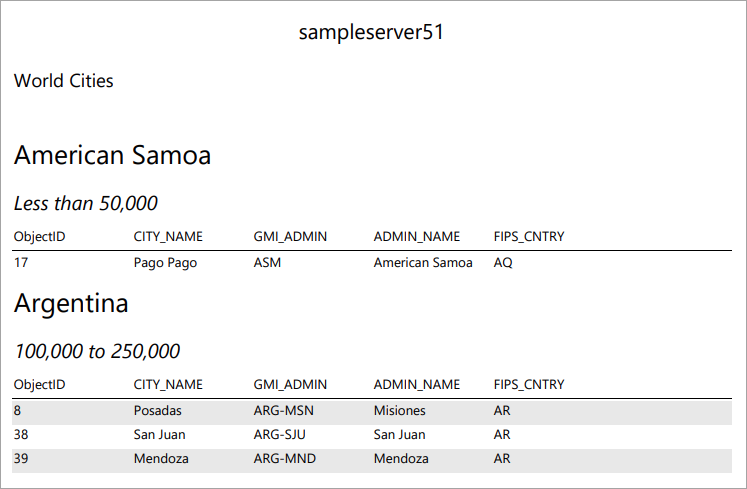
- Click the Preview button.
The group headers display once at the beginning of the report. To further organize the data, each header must appear once for each group of data.
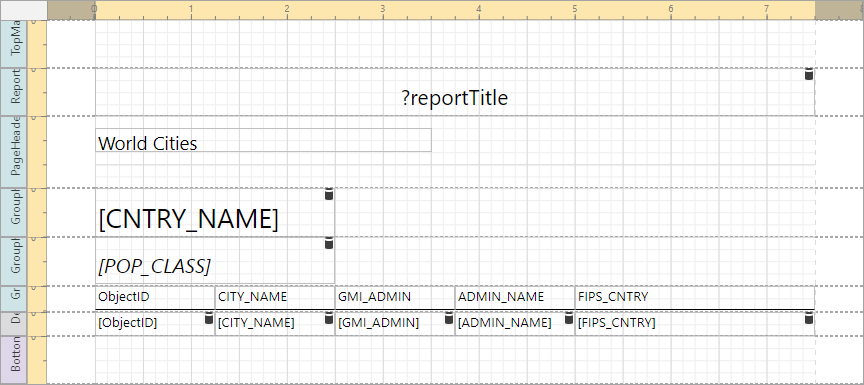
Your report should look similar to the image
Step 4: Configure the Group Header bands to group data
- Select GroupHeader2.
- In the Properties panel, expand the Actions property group.
- Add a field to the Group Fields property.
- Set Group By to POP_CLASS.
- Select GroupHeader3.
- Add a field to the Group Fields property.
- Set Group By to CNTRY_NAME.
- Click the Preview button.
The group headers now appear once for every group of data. However, there are still no bookmarks to help navigate this large report.
Your report should look similar to the example
Step 5: Configure the Group Header Navigation properties
- In GroupHeader2, select the POP_CLASS label.
- Open the Expressions
 panel.
 - In the Bookmark property, click ...
- In the Expression Editor dialog, select the Fields heading from the column in the bottom left of the dialog.
- In the bottom right column, double-click POP_CLASS.
[POP_CLASS] is added to the expression.
- Click OK.
- In GroupHeader3, select the CNTRY_NAME label.
- In the Bookmark property, click ...
- Enter
[CNTRY_NAME]into the expression and click OK. - Click the Preview button.
- In your PDF viewer, open the bookmarks feature.
The header of the document map reads Report. When expanded, all headers from the report appear in one long list, with no hierarchy imposed.
Step 6: Configure the document map hierarchy
- Select the POP_CLASS label control.
- Open the Properties Panel.
- Under the Navigation heading, open the Parent Bookmark drop-down list.
- Expand GroupHeader3 and then select the label control.
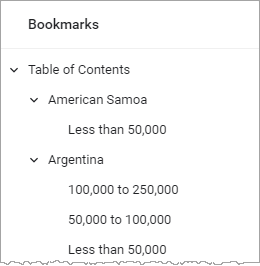
- In the Report Items List, select Report.
- In the Bookmark property, enter
Table of Contents. - Click the Preview button.
- Open the bookmarks feature.
The document map appears with Table of Contents as the heading, and all sub-headings are organized in a hierarchical format.
- Enlarge the ReportHeader1 band.
- Drag the Table of Contents control into the ReportHeader1 band.
- Open the Properties panel and expand the Behavior property group.
- Expand the Level Title property group.
- Set the Text property to
Table of Contents. - Run the Preview.
Your document map should look similar to the example
Optional: Add a Table of Contents control
Configuring the bookmark navigation of a report lays the groundwork configuration for having a Table of Contents Control in your report.
By default, the table of contents starts on a new page. Each item in the table is linked to the location in the report of the item.