Create a Workflow
To build a workflow, you drag activities from Workflow Designer's Activities panel onto the design area one at a time and set the activity's properties. The design area displays a visual model of the business process that you are automating. When you have added and configured all the activities in the workflow, you test the workflow using Workflow Designer's built-in simulator. To aid in debugging, the simulator allows you to set breakpoints where the workflow pauses execution. This allows you to examine intermediate states of the workflow.
When you have completed the workflow, you add it to each Geocortex Essentials site with one or more viewers that will run the workflow. You can configure a workflow to run automatically whenever one of the site's viewers starts. You can also configure individual viewers to allow the user to run the workflow on demand. If the workflow displays anything to the user, for example, forms to gather user input, then you must configure at least one workflow container. Workflow containers are the viewer regions where workflows display content to the user.
Finally, if the workflow uses one or more custom activities, you must deploy the custom assemblies to Essentials.
Main Steps to Create and Use a Workflow
The main steps to create and use a workflow are:
-
Create the workflow in Workflow Designer.
-
Add the workflow to the site.
If you have already added the workflow to another site, you can import the workflow from the other site.
-
Configure a method to run the workflow in a viewer.
Create your First Workflow
For help creating your first workflow, we recommend that you watch the Introduction to Workflow video from the 2014 Geocortex User Conference.
Create a New Workflow
Create a Blank Workflow
When you launch Workflow Designer, a new, blank workflow opens. You can also create a new, blank workflow when Workflow Designer is already running.
![]()
New, blank workflow
A blank workflow consists of an empty Sequence activity and nothing else. Sequence activities act as containers for other activities. The activities within the Sequence activity run sequentially. You can use a Flowchart activity instead of a Sequence activity, if you prefer. Like Sequence activities, Flowchart activities act as containers for other activities.
To create a new, blank workflow in Workflow Designer:
-
Do one of the following:
-
Click the New icon
 in the ribbon, or
 -
Press Ctrl + N, or
-
Select File | New | Blank Workflow.
If a workflow with unsaved changes is open, you are prompted to save your changes. The workflow is then closed and a new, blank workflow opens. The new workflow contains an empty Sequence activity.
-
-
If you want to start the workflow with a Flowchart activity instead of a Sequence activity:
-
Click the empty area in the Sequence activity's title bar.
The title bar and frame turn yellow.
-
Press the Delete key on your keyboard.
-
In the Activities panel, click the down arrow
 beside Flowchart to show the Flowchart activities.
 -
Drag the Flowchart activity to the center of the design area, where it says Drop activity here.
-
-
To rename the activity, click on the name in the activity's title bar and type in a new name.
The activity will be referred to by its new name throughout Workflow Designer.
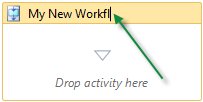
Type in a new name for the activity
Create a Workflow from the Clipboard
Workflows are stored as XAML files. If you have copied XAML text into the Windows clipboard Essentials Workflow Designer can create a new workflow from it.
To create a new workflow from XAML text:
-
Highlight the XAML text that you wish to load and copy it using standard Windows text copying techniques.
-
Select File | New | From Clipboard.
The workflow will load.
If the clipboard contains invalid or incomplete XAML text it will not be able to create a new workflow and it will present an error message.
Create a Layer Filter Workflow
Layer filter workflows enable you to restrict the features of layers that different users have access to.
Essentials implements filtering by attaching a WHERE clause to requests made to ArcGIS Server. Each WHERE clause is built by a workflow that is associated with a particular layer—the layer filter workflow.
Creating the workflow is just one step to set up layer filtering. For full instructions, see Filter a Layer's Features.
Layer filtering works like this: Suppose Essentials receives a request for the layer with ID=4. Essentials looks to see if there is a layer filter workflow configured for layer 4. If there is, Essentials runs the workflow to create the WHERE clause, appends the WHERE clause to the request, and then forwards the request to ArcGIS Server. ArcGIS Server will return only those features that satisfy the condition in the WHERE clause.
For example, where "City='Paris'" returns only features that have "Paris" as the value of the City attribute.
The attribute that you filter on must be an attribute of the layer that you configure the workflow for (the layer to be filtered). If the layer that the workflow is configured for does not have a City attribute, the WHERE clause will fail and no features will be returned (no one will be able to access any of the features on that layer).
For string attributes like City, the value in the WHERE clause must match the value in the feature exactly, including the case—"Paris" does not match "Paris!" or "PARIS" or "paris".
WHERE clauses can also have complex conditions built with logical connectors like AND and OR. Your workflow must return a string that contains the condition to use in the WHERE clause. The string must not have "where" in it, only the condition—Essentials adds the "where".
Sample Layer Filter Workflow
Essentials Workflow Designer provides a sample layer filter workflow to use as the starting point for your layer filter workflows. To open the sample workflow in Essentials Workflow Designer, click New in the File menu, and then select Layer Filter Workflow. The sample workflow will open.
The sample workflow illustrates how to build a WHERE clause based on the current user's roles and the STATE attribute. In the sample workflow, administrators can access all the features on the layer—nothing is filtered. Staff can only see features for a particular state—features in other states are filtered out.
If the user does not have the Administrator or Staff role, only features for that user are returned. This points to something that you can do with editable layers: when a user adds a feature, save the user name as an attribute of the feature, and then create a layer filter that only allows users to see the features they added—filter out other people's features.
The sample workflow's logic is as follows:
Deny everyone access (filter out all features).
Get the current user's user name and roles.
If the current user has one or more roles then
   If the current user has the Administrators role then
      The WHERE clause is empty. (No features will be filtered.)
   Else
      If the current user has the Staff role then
         The WHERE clause specifies the state that Staff are allowed to see.
      Else
         The WHERE clause specifies the user name stored in the feature.
Usually, features are filtered based on the user's roles like in the sample workflow, but this is not a requirement. You could create a workflow that filters the same features for all users. In this case, your workflow would not need conditions that test the user's roles.
The following screen capture and table explain the sample layer filter workflow in more detail.
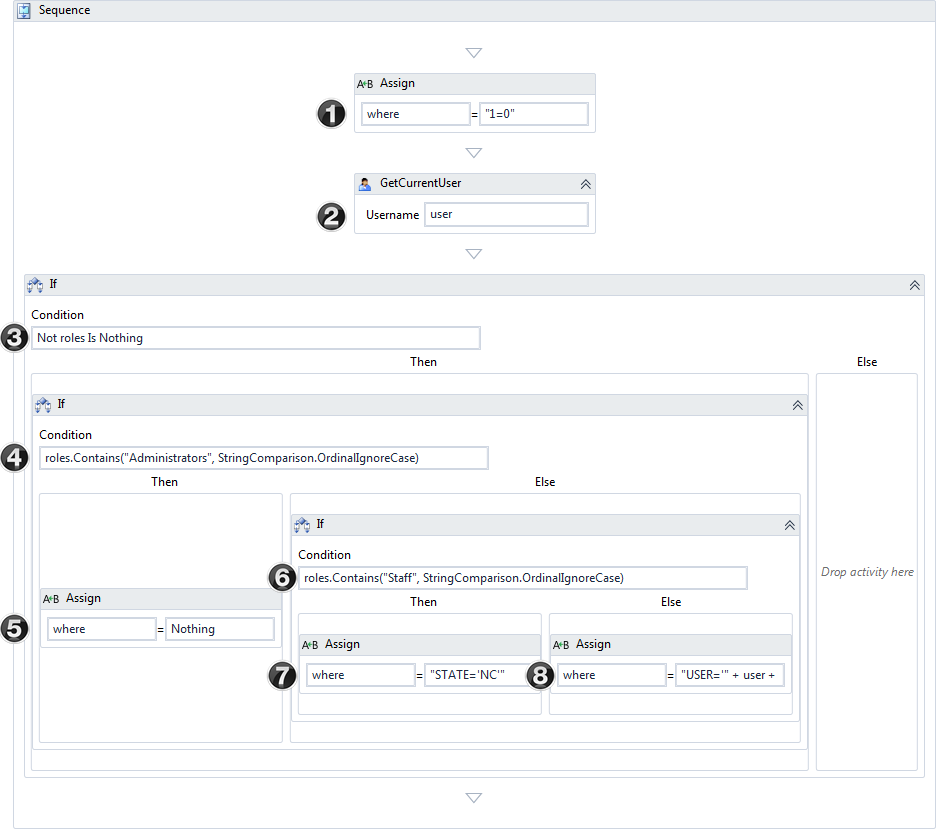
Sample layer filter workflow, with numbering added
The sample workflow has four arguments, all of which are strings:
-
Input Arguments:
layerId,layerName, anddynamicLayer -
Output Argument:
where
When the request to be filtered is for a static layer, or for a dynamic layer whose data source is a map layer, Essentials assigns the layer's ID and name to the layerID and layerName input arguments. The dynamicLayer input argument is used for dynamic layers whose data source is not a map layer.
The where output argument is used in the workflow to build the WHERE clause for Essentials to attach to the request.
Layer filter workflows for dynamic layers may require additional logic. If the dynamic layer's data source is not a map layer, Essentials passes the layer's JSON definition to the workflow via the dynamicLayer input argument. The workflow must parse the JSON to determine which map layer the dynamic layer represents, and then build the WHERE clause accordingly.
Dynamic layers whose data source is a map layer do not require this additional logic. For these layers, Essentials has access to the map layer's name and ID, the same as it would for a static layer.
Do not remove or rename the workflow arguments, or create additional workflow arguments—the Layer Filtering feature will not work if you change the arguments in any way.
Explanation of Steps in the Sample Layer Filter Workflow
|
# |
Activity or Condition |
Notes |
|---|---|---|
|
|
|
Initialize the |
|
|
|
Get the user name and roles of the current user. This assigns the user's roles to the |
|
|
|
Make sure the |
|
|
|
Ignoring capitalization, check whether the user has the Administrators role. |
|
|
|
Set the
Essentials does not append the WHERE clause when it is set to one of these values, so no filtering is done. |
|
|
|
Ignoring capitalization, check whether the user has the Staff role. |
|
|
|
Set the |
|
|
|
Set the |
Create a Report DataSet Transform Workflow
Report DataSet Transform workflows are workflows that modify the data set for a report or printout. These workflows run after Essentials generates the data for the report or printout, but before Essentials formats the data. This gives you a chance to modify the data that is included in the report or printout. For example, you could create a workflow that:
-
includes additional data from related data sets
-
adds calculated fields to the data set
-
removes duplicates
-
sorts the data
Report DataSet Transform workflows have one input argument, reportData, of type System.Data.DataSet. The workflow can modify the data set in any way.
Report DataSet Transform workflows cannot include client activities—they must run entirely on the server. When you create a new DataSet Transform workflow in Essentials Workflow Designer, the workflow contains a ServerScope activity. This activity generates a validation error if you add a client activity to it.
![]()
Essentials Workflow Designer's central panel, showing a new Report DataSet Transform workflow
To use a Report DataSet Transform workflow, you must first create the workflow, and then associate the workflow with its report template or print template in the site configuration.
To create and configure a Report DataSet Transform workflow:
Step 1: Create the Workflow
-
In Essentials Workflow Designer, click File | New | Report DataSet Transform Workflow.
-
Create the workflow.
-
Save the workflow.
Step 2: Associate the Workflow with its Template
-
In Geocortex Essentials Manager, edit the report template or print template whose data set the workflow operates on.
-
In the Transform Workflow URI box, enter the workflow's URI.
-
Click Apply Details.
-
Click Save Site.
Create a Query Transform Workflow
Query Transform workflows are workflows that modify the results of WMS GetFeatureInfo requests. These workflows run after Essentials gets the results, but before the results are returned to the viewer. This gives you a chance to modify the results before the end user sees them.
Query Transform workflows have one input argument, queryData, of type System.Data.DataSet. The input is the DataSet that contains the WMS GetFeatureInfo data. The workflow can modify the DataSet in any way. The modified DataSet is sent to the viewer as a FeatureSet. For example, you could calculate a new column value and add it to the DataSet.
Query Transform workflows cannot include client activities—they must run entirely on the server. When you create a new Query Transform workflow in Essentials Workflow Designer, the workflow contains a ServerScope activity. This activity generates a validation error if you add a client activity to it.
![]()
Essentials Workflow Designer's central panel, showing a new Query Transform workflow
To use a Query Transform workflow, you must first create the workflow, and then associate the workflow with the map service in the site configuration.
To create and configure a Query Transform workflow:
Step 1: Create the Workflow
-
In Essentials Workflow Designer, click File | New | Query Transform Workflow.
-
Create the workflow.
-
Save the workflow.
Step 2: Associate the Workflow with the Map Service
-
In Geocortex Essentials Manager, edit the map service whose query results the workflow operates on.
-
Click the Functional tab.
-
In the Query Transform Workflow URI box, enter the workflow's URI.
-
Click Apply Settings.
-
Click Save Site.
Save a Workflow
When you save your workflow, by default, it saves as a XAML file.
A good practice is to save your custom workflows in a directory within the Geocortex Essentials Sites folder, as this is the top folder that can be accessed through Geocortex Essentials Manager. This keeps all your workflows in a central location that can be used by multiple sites.
In the default installation, the Sites folder is here:
C:\Program Files (x86)\Latitude Geographics\Geocortex Essentials\Default\REST Elements\Sites
To save a workflow:
-
Do one of the following:
-
Click Save
 on the application ribbon.
Or
-
Click File | Save.
-
-
Navigate to the folder where you want to keep the workflow file.
-
In the File name box, type in a name for your workflow.
If you give the workflow a name that describes what it does, it will be easy to identify.
-
Click Save.
Search a Workflow
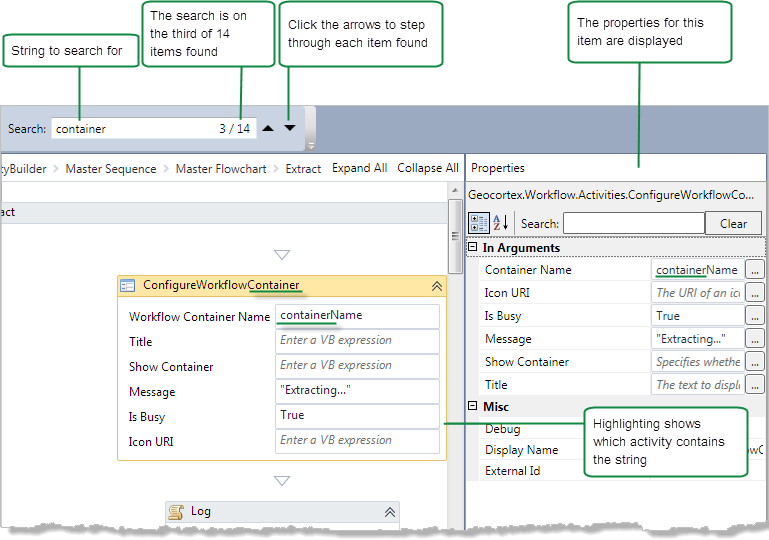
From version 3.15 of Geocortex Essentials, the Workflow Designer has the ability to search for a particular string of characters inside a workflow in the Activity Builder. Searches are case sensitive.
In a search, the application looks for the search string in the following:
-
Activity display names.
-
Activity type names - the .NET name of each activity type.
-
Activity runtime IDs that are assigned to each activity by the system.
-
Any matching text in an expression, for example, variable names, operators, or literal values.
-
Annotations for activities.
Each activity added to a workflow is given an activity ID. When the application reports an error, it identifies which activity the error is in and logs the Activity ID. If you are working in a very long workflow, this makes finding errors much easier.
During a search, the number of times the string occurs in the workflow is displayed in the Search box. You can scroll through each item using the up and down arrows. As you click through each item, it is highlighted in the workflow.
In addition, the Properties update to show which element is currently highlighted.
If you are zoomed in to an element, the highlighting may not be visible, but it is always possible to see the element in the Properties.
Export the Workflow Image
You can export the image of a workflow in two ways:
-
Save As Image: Saves the image of the current workflow to a JPG file.
-
Copy As Image: Copies the image of the current workflow to the clipboard. You can then paste the image anywhere the Windows Paste command works, for example, in a Microsoft Office application.
Everything that is visible in the design area can be exported. You can control which parts will be saved or copied by selecting that part of the workflow in the breadcrumb links at the top of the design area.
For example, if you select the If activity in ActivityBuilder > Sequence > If, the If activity and everything within its scope is exported. To export the entire image, select the activity that contains the whole workflow, which is the first activity in the breadcrumb links. In this example, it would be Activity Builder.
The Save As Image and Copy As Image commands are available from the Edit menu or by right-clicking anywhere in the workflow image.
To export a workflow Image to a folder:
-
Do one of the following:
-
Right-click anywhere within the workflow image and select Save as Image.
or
-
Click Edit | Save As Image.
-
-
In the Save As dialog box, navigate to the folder where you want to save the image and select it.
-
Type a name for the workflow image in the File name box.
-
If you want to change the file format of the image, click the Save as type drop-down list and select either JPEG, PNG, GIF, or XPS.
-
Click Save.
To copy and paste the image into another application:
-
Do one of the following:
-
Right-click anywhere within the workflow image and select Copy as Image.
or
-
Click Edit |Copy As Image.
The image is copied to the clipboard and you can paste it into any application that accepts the Windows Paste command.
-