Activities
Activities are units of work that are chained together or nested to form workflows—they are the building blocks of a workflow.
Essentials Workflow Designer has a built-in library of activities that you can use to create workflows. Some activities are taken directly from Microsoft Workflow Foundation, while others are specific to Geocortex Workflow. The activities provided by Essentials Workflow Designer include ArcGIS Server-specific activities like geoprocessing and querying, as well as general GIS activities like buffering and data transformations. There are also activities that support the interactivity of Geocortex workflows, such as prompting users for input or displaying alerts to the user.
Some activities represent actions and others control the workflow's flow of execution. When a control flow activity executes, the result is a decision about which execution path to follow. Geocortex Workflow control flow activities are similar to those you would find in an imperative programming language, such as conditions and loops. Geocortex Workflow also offers more complex control flow activities such as parallel processing activities.
Activities Panel
Essentials Workflow Designer's Activities panel contains the Activity Library, a complete list of activities, organized by category. If you develop custom activities, they are added to the Activity Library when you deploy the assemblies.
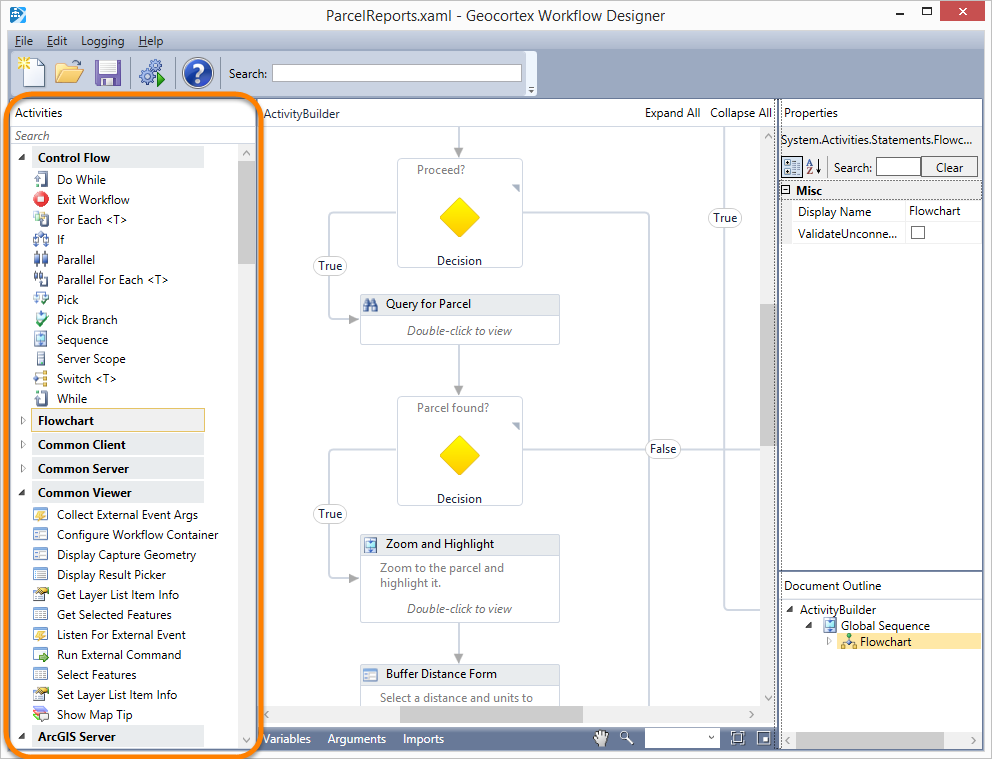
Essentials Workflow Designer's Activities panel
The Activities panel allows you to search for activities and get help for a particular activity. To add an activity to the workflow that you are creating, you drag the activity from the Activities panel and to the workflow in the design area.
Find a Particular Activity in the Activities Panel
To find a particular activity in the Activities panel:
-
Start to type the name of the activity in the Search box at the top of the Activities panel.
The Activities panel will show the matching activities.
To return to the full list of activities:
-
Delete the text from the Search box.
Get Help for a Particular Activity
To see a description of an activity:
-
Hover over the activity in the Activities panel.
A tool tip describing the activity will display.
To see detailed information about an activity:
-
Right-click the activity and select the Help option.
Alternatively, select the activity and press F1.
Essentials Workflow Designer's help system will open to the page for that activity. The individual activities are described in the Activity Library section of the help system.
Add an Activity
To add an activity to a workflow, you drag it from the Activities panel into the design area. You can move activities at any time after they have been added to the workflow.
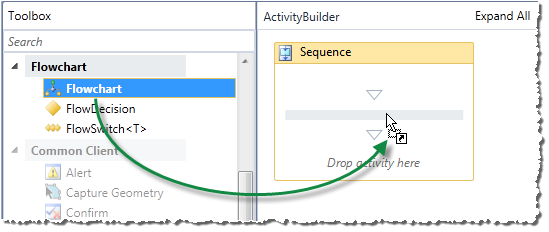
Activity added into a workflow
To add an activity:
-
Click and drag an activity from the Activities panel to its position within the workflow.
You can add an activity wherever you see a landing spot
 or where you see the Drop activity here message in the workflow image. The workflow image automatically splits to accommodate the new activity.
 You can simultaneously add an activity and pan the workflow—the workflow image scrolls automatically when you bump the frame of the design area with the activity you are dragging.
If you add an activity that has properties that are required, an error icon
 displays in the activity's header. The error icon will disappear once you have entered values for the required properties. Hover the mouse pointer over the error icon to see a list of the activity's required properties.
Copy and paste activities using Ctrl+C and Ctrl+V. This is a quick and easy way to add a particular activity multiple times.
Rename an Activity
To make a workflow more readable and easier to debug and maintain, give each activity a name that describes what the activity does.
To change an activity's name:
-
Click the name in the activity's title bar and type in a new name.
Alternatively, in the Properties pane, change the name beside the Display Name property.
-
Click away from the activity.
Configure an Activity's Properties
Each activity is represented in the design area as a box with a header and several property fields. To configure an activity, you enter values for the properties.
You can configure properties in the design area or in the Properties pane, but only the Properties pane provides a complete list of all the properties for a particular activity. Some of an activity's required properties may not show in the design area.
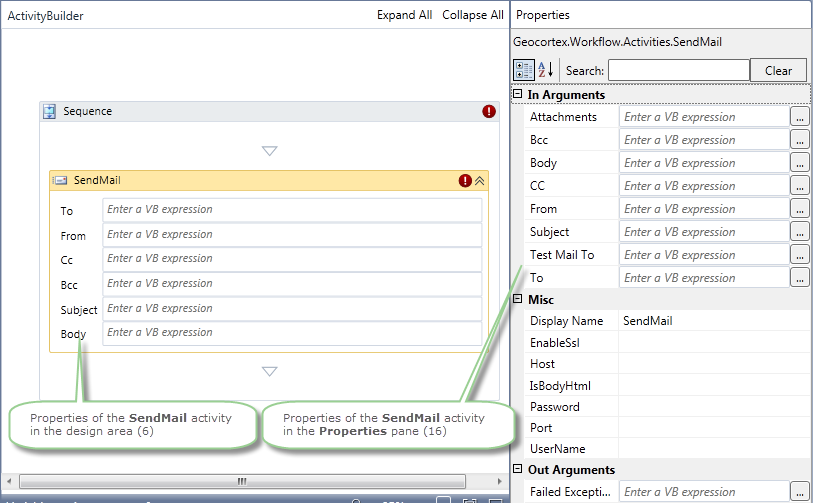
Properties of the Send Mail activity in the design area and Properties pane
Activity properties are Visual Basic expressions. Many of the values that you enter are one of the following:
-
Variables: The name of a variable that appears in the Variables table is a valid expression, provided the activity is within the variable's scope.
-
Strings: In Visual Basic, strings are surrounded by double quotation marks.
For more information on Visual Basic expressions, see the Microsoft article Operators and Expressions in Visual Basic.
Some activities that display content to the user allow you to configure where the content is presented, its title and icon, and other aspects of its appearance. For information, see Workflow Containers.
Find the Data Type of a Property
To be valid, the value of a property must be of the correct data type for that property. In all the properties in the Properties pane, you can find the data type to use for that property before you configure it.
To find the data type of an activity property:
-
Select the activity in the workflow design area.
-
In the Properties frame, hover the pointer over the name of the property.
A tool tip that includes the data type will appear.
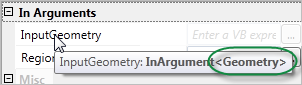

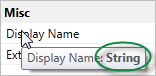
Data types shown in property tool tips
Move an Activity
You can move activities around on the design surface to change their position within the workflow.
To move an activity after it has been placed in the design area:
-
Drag the activity to its new position and drop it.
In a flowchart, you can also use your keyboard's arrow keys to move the activity.
Remove an Activity
To remove an activity from the workflow:
-
Right-click the activity on the design surface and select Delete.
Alternatively, select the activity and press Delete on your keyboard.
Activity Validation
Geocortex Essentials Workflow Designer
Geocortex Workflow Designer validates the activities that you add to a workflow, including checking the syntax of Visual Basic (VB) expressions. Workflow Designer displays an icon ![]() in the title bar of an activity with a validation error. To see a tool tip describing the error, hover the mouse pointer over the icon.
in the title bar of an activity with a validation error. To see a tool tip describing the error, hover the mouse pointer over the icon.
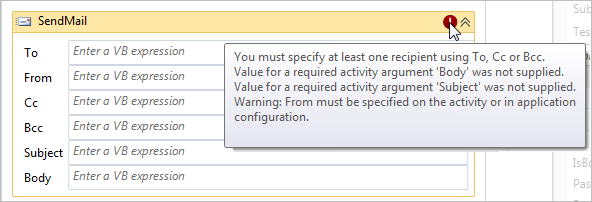
Tool tip describing validation errors
When you add an activity with required properties, the error icon appears right away. The icon disappears as soon as you enter values for the required properties.
You can save a workflow that has validation errors, but you cannot run it in the simulator.
Connections in Flowchart Activities
In a Flowchart activity, activities are connected together. These connections define the workflow's possible paths of execution. An activity that does not have a connection coming into it cannot execute.
In the design area, connections are represented as arrows. For example, in the following screen capture, when the workflow starts, the Initialize Workflow activity executes first, followed by the Address Search Form activity, and so on, following the arrows.
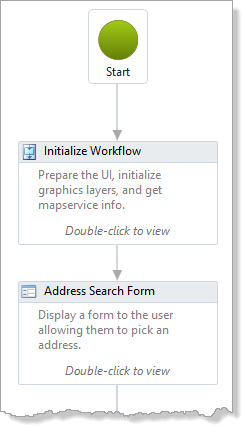
Arrows indicate execution paths
Connect Two Activities in a Flowchart
To connect two activities:
-
Hover the pointer over the activity from which you want to make a connection.
The connection points appear.
-
Click the connection point where you want the connection to begin and hold down the mouse button.
-
Drag the pointer away from the activity.
The connection starts to appear as you drag the pointer.
-
Drag the pointer to the activity that you want to connect to.
The connection points show on the destination activity.
-
Position the pointer over the connection point where you want the connection to end.
-
Release the mouse button.
Move a Connection in a Flowchart
Whenever possible, Essentials Workflow Designer automatically connects activities when you add a new activity to the workflow. You can move a connection to connect to a different activity.
To move a connection in a flowchart:
-
Click the arrow that represents the connection.
The arrow turns yellow. The arrow's endpoints and vertices are marked with a yellow circle.
-
Drag the yellow circle at the arrow's head to the activity that you want to connect it to.
The connection points appear.
-
Position the pointer over the connection point that you want to connect to.
-
Release the mouse button.
Remove a Connection in a Flowchart
To remove a connection in a flowchart:
-
Click the arrow that represents the connection you want to remove.
The arrow turns yellow.
-
Press Delete on your keyboard.
Workflow Containers
Workflow containers define the
Workflow display activities—DisplayForm, DisplayHyperlink, DisplayCaptureGeometry, and DisplayResultPicker—each have a Workflow Container Name property where you specify the container to use. The
DisplayForm activity's content displayed in an HTML5 viewer's DataRegion
The
-
Default: Displays the content in the DataRegion and provides a Close button
 so users can close the tab.
 -
DefaultNoCloseButton: Displays the content in the DataRegion with no Close button.
-
ModalWindow: Displays the content in the ModalWindowRegion and provides a Close button
so users can close the window. -
ModalWindowNoCloseButton: Displays the content in the ModalWindowRegion with no Close button.
To use a predefined container, enter the container's name in the Workflow Container Name property when you configure the activity in Essentials Workflow Designer. For example, to use the predefined Default container, set Workflow Container Name to "Default".
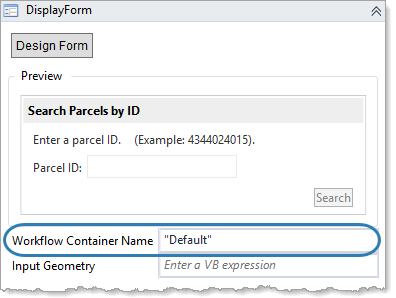
DisplayForm activity that uses the predefined Default container
If the predefined containers do not offer what you need, you can create custom containers by adding new items to thecontainers array in the HTML5 Viewer's Workflow Module
We do not recommend modifying the out-of-the-box containers. Create a new container instead.
The Geocortex software does not place a limit on the number of different containers that you can define in a viewer or use in a workflow. For workflows that proceed through a number of steps similar to a software wizard, you may want to use the same container for all the display activities. This creates a smooth transition from one step to the next. In this case, rather than hard coding each activity to the same container name, we recommend that you store the container name in a variable.
If you do not specify the workflow container for an activity, then the activity's content is displayed in the default region using the default title and icon. You can configure these defaults using thedefaultContainerRegionName, defaultContainerTitle, and defaultContainerIconUri properties.
To create a custom workflow container for a workflow that will run in an HTML5 viewer:
Step 1: Configure a Workflow Container in the Viewer
-
Open one of the viewer's configuration files in a text editor.
-
Find the Workflow Module.
-
Add a new item to the module's
containersarray and configure its -
Optionally configure the
defaultContainerRegionName,defaultContainerTitle, anddefaultContainerIconUri. -
Repeat these steps for each configuration file.
Step 2: Reference the Workflow Container in the Workflow
-
In each workflow activity where you want to use your custom container, set the Workflow Container Name property to the
namethat you defined in the viewer configuration.
See also...
About Editing Viewer Configuration Files
ConfigureWorkflowContainer Activity
Workflow Designer also has a ConfigureWorkflowContainer activity that allows you to modify aspects of a workflow container while the workflow is running, such as the title, message, and the container's visibility. You cannot modify the region.
The ConfigureWorkflowContainer activity is used to control the display until the next display activity executes. For example, you could use a ConfigureWorkflowContainer activity to show a Loading message at the beginning of a workflow, before the first activity displays. You could then have another ConfigureWorkflowContainer activity in the middle of the workflow to ask the user to wait while processing completes, for example during geoprocessing. The message can also be updated periodically within an intensive data processing routine, to display status updates on a single long process.
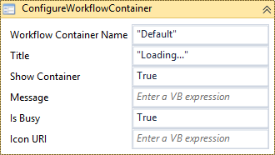
Example of a ConfigureWorkflowContainer activity