Choose a Method to Sign In to Manager
Before you can use Essentials Manager, you must specify how to authenticate administrators when they sign in to Manager. The sign-in methods are:
-
Portal for ArcGIS: Use a Portal for ArcGIS account to sign in to Manager. Portal for ArcGIS performs the authentication.
-
ArcGIS Online: Use an ArcGIS Online account to sign in to Manager. ArcGIS Online performs the authentication.
-
Windows: Use a Windows account to sign in to Manager. Windows performs the authentication. This is the default sign-in method.
Windows supports single sign-on. To be signed in to Manager automatically, you must already be signed in to Windows and the browser's security settings must have automatic authentication enabled under the current user name and password, for the appropriate zone. If one or more of these conditions is not met, you will be prompted to sign in.
Implications of the Sign-in Method
The sign-in method that you choose has implications beyond how administrators are authenticated. The sign-in method also affects:
-
The types of content that you can use in your sites:
-
Portal for ArcGIS: If you want to use private Portal for ArcGIS content in your sites, you must configure sign-in using Portal for ArcGIS.
You do not need to configure the Portal for ArcGIS sign-in method to use public Portal for ArcGIS content in your sites.
-
ArcGIS Online: If you want to add private ArcGIS Online web maps and services to your sites, you must configure sign-in using ArcGIS Online.
You do not need to configure the ArcGIS Online sign-in method to use public ArcGIS Online content in your sites.
You cannot mix private Portal for ArcGIS content and private ArcGIS Online content within one instance of Essentials. You can always use public Portal for ArcGIS and ArcGIS Online content in your sites, no matter which sign-in method you choose—Portal for ArcGIS, ArcGIS Online, or Windows.
-
-
How end users can be authenticated when they access secured sites:
-
Portal for ArcGIS: If you want end users to be able to sign in using their Portal for ArcGIS account when they launch a viewer, you must configure the Portal for ArcGIS sign-in method.
-
ArcGIS Online: If you want end users to be able to sign in using their ArcGIS Online account when they launch a viewer, you must configure the ArcGIS Online sign-in method.
Configuring one of the ArcGIS sign-in methods creates an ArcGIS security provider that you can use to configure permissions in Manager. For information about securing sites, see Security.
Essentials always has a Windows Integrated security provider that enables you to secure your sites using Windows Authentication. You do not have to configure the Windows sign-in method in the Post Installer to get a Windows Integrated security provider.
-
-
Service Connections:
When Essentials is registered with ArcGIS Online, your Essentials installation has a built-in service connection for your private ArcGIS Online content. The built-in connection enables you to search your private ArcGIS Online content. The only way to use private ArcGIS Online content in Essentials sites is to register Essentials with ArcGIS Online when you configure the method to sign in to Essentials. For information about service connections, see Service Connections.
The built-in ArcGIS Online service connection does not appear in the list of service connections in Essentials, and you cannot add an ArcGIS Online service connection when Essentials is registered with ArcGIS Online, because your Essentials instance has a built-in connection.
For Portal for ArcGIS, you must register Essentials with Portal for ArcGIS to access your private content. This creates a built-in service connection that you cannot see in Manager, so you do not need to add a service connection. If Essentials is not registered with Portal for ArcGIS, you can add a service connection to a portal to access public content.
Single Sign-On
Single sign-on signs you in automatically, so you do not need to enter your user name and password.
Single sign-on to Manager requires the Windows sign-in method. The ArcGIS sign-in methods do not support single sign-on.
When you launch Manager, in order to be signed in automatically, you must already be signed in to Windows. In addition, your browser's security settings must have automatic authentication enabled under the current user name and password, for the appropriate zone. If one or more of these conditions are not met, you will have to enter your user name and password to sign in.
To configure single sign-on to Manager:
-
Choose the Windows sign-in method.
Follow the instructions in Manager Sign-In Using Windows.
-
Enable Windows Authentication.
Follow the instructions in Configure Windows Features.
Manager Sign-In Using Portal for ArcGIS
Configuring the Portal for ArcGIS sign-in method enables you to:
-
Use your private Portal for ArcGIS content, in your Essentials sites.
-
Secure your Essentials sites using Portal for ArcGIS to authenticate end users.
-
Sign in to Essentials using one of the following types of account:
-
Administrative accounts for your Portal for ArcGIS organization.
-
The account that you use to set up access to Portal for ArcGIS in the Post Installer.
You can change the Portal for ArcGIS account types that are allowed to sign in to Essentials. For instructions, see Account Types that can Sign in to Manager.
-
When you configure the ArcGIS Web Adapter, which is used with Portal for ArcGIS, ensure that Anonymous Authentication is enabled so that the Essentials login process is successful for Essentials Manager and for the HTML5 Viewers added to a site.
When you configure Portal for ArcGIS sign-in, you must set up access to Portal for ArcGIS for Essentials ("register" Essentials with Portal for ArcGIS). To register Essentials, you will:
-
Configure the Portal for ArcGIS URL for the administrator's browser to point to when Essentials launches.
-
Add an application in Portal for ArcGIS.
-
Sign in to Portal for ArcGIS when the Post Installer prompts you to.
The Portal for ArcGIS application that you add is used by the Post Installer to create two web mapping applications, called Geocortex Essentials and Geocortex Essentials Manager. Essentials and Manager use these web mapping applications to access your private Portal for ArcGIS content.
When you complete the post-installation configuration, you can sign in to Portal for ArcGIS and see these web mapping applications in the Geocortex Products folder on your My Content page.
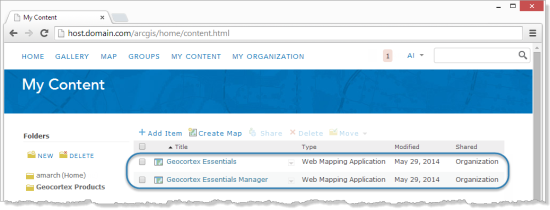
Portal for ArcGIS Web mapping applications created by the Post Installer
Configuring the Portal for ArcGIS sign-in method creates an ArcGIS security provider in Manager. This enables you to secure sites by applying permissions to Portal for ArcGIS users and roles. When users launch a viewer, they can be authenticated by Portal for ArcGIS. For more information, see The ArcGIS Security Provider.
The only way to add a security provider that authenticates users using Portal for ArcGIS is to configure the Portal for ArcGIS sign-in method in the Post Installer.
Configure Sign-In Using Portal for ArcGIS
To configure sign-in using Portal for ArcGIS:
Step 1: Configure the Portal for ArcGIS URL in the Post Installer
-
In the Post Installer, click Configure Sign-In Options in the side panel.
-
Beside Sign in using, select ArcGIS.
-
In the URL box, type or paste the URL for your portal.
If you deployed Portal for ArcGIS to the default location, the URL will be similar to
https://server.domain.com/arcgis/. Replaceserver.domain.comwith the fully qualified host name of the server that hosts Portal for ArcGIS. -
Click Test.
The Post Installer connects to the URL. When the connection succeeds, the Post Installer displays a hyperlink to your portal.
-
Click the hyperlink to open your portal in a browser.
Step 2: Create an app in Portal for ArcGIS
-
Sign in to your portal.
-
In your portal, create a Portal for ArcGIS application for the Post Installer to use.
The Post Installer will use this application to add two web mapping applications to your portal. Essentials and Essentials Manager use the web mapping applications to access your private portal content.
If you have already created an application for the Post Installer to use, you can skip this step and use the existing application.
-
Click Add Item.
-
Select An application from the The item is drop-down list.
-
Select Application.
-
In the Title box, enter a title for the application, for example, Geocortex Post Installer.
-
In the Tags box, add a search tag to help locate this application, for example, Geocortex.
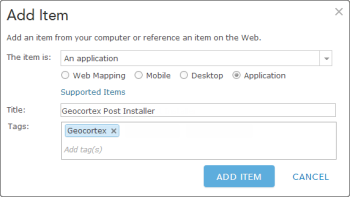
Add a Portal for ArcGIS application for the Post Installer to use
-
Click Add Item.
The application's details page opens.
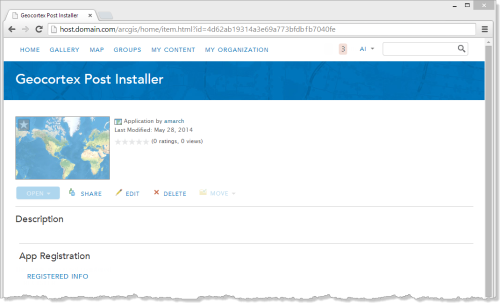
Details page for the Geocortex Post Installer application in Portal for ArcGIS
In the screen capture above, the App Registration area has a Registered Info hyperlink. This indicates that the application was registered automatically when you added it.
-
-
If the App Registration area has a Register hyperlink instead of a Registered Info hyperlink, you must register the application manually:
-
In the App Registration area, click Register.
-
In the App Type drop-down list, select Multiple.
-
In the Redirect URI box, type or paste the following URI:
urn:ietf:wg:oauth:2.0:oob
-
Click Add.
-
Click Register.
The dialog box closes and the application is registered. Registration creates the application's ID and secret, which are used like a user name and password.
-
-
In the App Registration area, click Registered Info.
You will need the App Registration information when you finish the post-installation configuration.
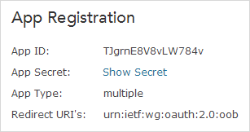
App Registration information in Portal for ArcGIS
Step 3: Configure the app ID and app secret in the Post Installer
-
In the Post Installer, click Finish.
The App Registration dialog box opens.
-
In the App Registration dialog box, copy and paste the App ID and App Secret from Portal for ArcGIS to the Post Installer, and then click OK.
You are prompted to sign in to Portal for ArcGIS.
The application's secret is encrypted in Essentials. Essentials does not share this information with any other application.
-
Sign in to Portal for ArcGIS using the same account that you signed in with when you created the application.
The Post Installer sets up access to your private Portal for ArcGIS content for Essentials, and then signs you out of Portal for ArcGIS.
If the Remember Me checkbox is selected when you sign in, you will not have to re-enter the App ID and App Secret each time you run the Post Installer.
You have now completed the configuration of Portal for ArcGIS sign-in.
Manager Sign-In Using ArcGIS Online
Configuring the ArcGIS Online sign-in method enables you to:
-
Use your private ArcGIS Online content, such as web maps and services, in your Essentials sites.
-
Secure your Essentials sites using ArcGIS Online to authenticate end users.
-
Sign in to Essentials using one of the following types of account:
-
Administrative accounts for your ArcGIS Online organization.
-
The account that you use to set up access to ArcGIS Online in the Post Installer.
You can change the ArcGIS Online account types that are allowed to sign in to Essentials. For instructions, see Account Types that can Sign in to Manager.
-
When you configure ArcGIS Online sign-in, you must set up access to ArcGIS Online for Essentials ("register" Essentials with ArcGIS Online). To register Essentials, you will:
-
Configure the ArcGIS Online URL for the administrator's browser to point to when Essentials launches.
-
Sign in to ArcGIS Online when the Post Installer prompts you to.
You have two choices for the URL that you configure:
-
URL for Your Organization in ArcGIS Online: For example,
https://organization.maps.arcgis.com/.If you specify the URL of your organization's ArcGIS Online portal, launching Manager opens the ArcGIS Online enterprise sign-in page. Only ArcGIS Online users from your organization can sign in.
-
URL for ArcGIS Online:
https://www.arcgis.com/.If you specify the URL for ArcGIS Online's home page, launching Manager opens the main ArcGIS Online sign-in page.
You can configure which users can access your site from your ArcGIS Online account, including unknown users who have an ArcGIS Online account. You can apply permissions for particular users and organizations from the Permissions page in Manager.
The Post Installer adds two web mapping applications to your ArcGIS Online portal. The web mapping applications are called Geocortex Essentials and Geocortex Essentials Manager. Essentials and Manager use these web mapping applications to access your private ArcGIS Online content.
When you complete the post-installation configuration, you can sign in to ArcGIS Online and see these web mapping applications in the Geocortex Products folder on your My Content page.
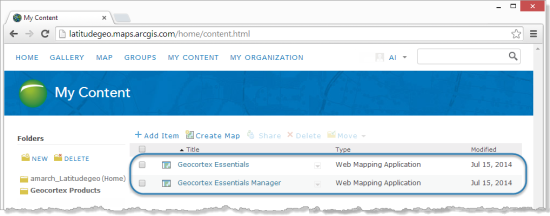
ArcGIS Online web mapping applications created by the Post Installer
Configuring the ArcGIS Online sign-in method creates an ArcGIS security provider in Manager. This enables you to secure sites by applying permissions to ArcGIS Online users and roles. When users launch a viewer, they can be authenticated by ArcGIS Online. For more information, see The ArcGIS Security Provider.
Before Essentials version 4.2, you could add ArcGIS Online security providers in Manager. Starting in version 4.2, the only way to add a security provider that authenticates users using ArcGIS Online is to configure the ArcGIS Online sign-in method in the Post Installer.
If you configured an ArcGIS Online security provider before Essentials version 4.2, the security provider and its associated permissions will continue to work when you upgrade to Essentials 4.2 or newer, as long as you configure the ArcGIS Online sign-in method. You can have at most one ArcGIS security provider.
If you configured an ArcGIS Online security providers before Essentials version 4.2, and you configure one of the other sign-in methods (Portal for ArcGIS or Windows) when you upgrade to Essentials 4.2 or newer, you will lose your ArcGIS Online security provider and all of its associated permissions.
Configure Sign-In Using ArcGIS Online
To configure sign-in using ArcGIS Online:
-
In the Post Installer, click Configure Sign-In Options in the side panel.
-
Beside Sign in using, select ArcGIS.
-
Do one of the following: In the URL box, type or paste the ArcGIS Online URL where you want end users to sign in:
Enter the URL for Your Organization's ArcGIS Online Portal
-
In the URL box, type or paste the URL for your organization's ArcGIS Online portal.
For example,
https://organization.maps.arcgis.com/. Replaceorganizationwith the name of your organization's ArcGIS Online subdomain.
Enter URL of ArcGIS Online's Home Page
-
In the URL box, type or paste the URL for ArcGIS Online's home page.
The URL is
https://www.arcgis.com/.Alternatively, you can click the
https://www.argis.com/hyperlink to enter the URL.
-
-
Click Test.
The Post Installer connects to the URL. When the connection succeeds, the Post Installer displays a hyperlink for the URL.
You will be prompted to sign in to ArcGIS Online when you finish the post-installation configuration. This allows the Post Installer to set up access to ArcGIS Online for Essentials.
-
Click Finish.
-
In the App Registration dialog box, sign in to ArcGIS Online.
The Post Installer sets up access to your private ArcGIS Online content for Essentials, and then signs you out of ArcGIS Online.
The information gathered from ArcGIS Online is encrypted in Essentials. Essentials does not share this information with any other application.
You have now completed the configuration of ArcGIS Online sign-in.
Manager Sign-In Using Windows
Choosing the Windows sign-in method:
-
Enables you to sign in to Manager using an account that belongs to the Windows group that you configure in the Post Installer.
-
Enables single sign-on to Manager when Windows Authentication is turned on.
For information on turning on Windows Authentication, see Configure Windows Features.
Configure Sign-In Using Windows
To configure sign-in using Windows:
-
In the Post Installer, click Configure Sign-In Options in the side panel.
-
Beside Sign in using, select Windows.
-
In the Group box, type the name of the Windows group that users must belong to in order to sign in to Essentials.
The default value is the built-in administrators group.
-
Click Finish.
You have now completed the configuration of Windows sign-in.
See also...