Run Essentials Behind a Reverse Proxy
This topic refers to using a reverse proxy, not to be confused with a proxy. A reverse proxy handles incoming requests and directs them to the Essentials server, whereas a forward proxy handles outbound requests from the Essentials server.
One way to make an Essentials deployment publicly available is to use a reverse proxy. In this deployment scenario, incoming requests from the Internet go to the reverse proxy. The reverse proxy forwards the request to the Essentials server, and returns responses to the client as though the reverse proxy is the Essentials server itself. A typical reason to use a reverse proxy is to provide access to a server behind a firewall.
Microsoft Application Request Routing (ARR) works well with Geocortex Essentials.
There are two main steps to configure Essentials to run behind a reverse proxy:
-
Register the reverse proxy's URL with Essentials.
This tells Essentials to accept requests that come from the reverse proxy.
-
Configure the REST API's external URL (optional).
You only need to do this if you use different internal and external URLs for your servers.
The external URL that you configure in Step 2 is used for operations that return a URL, such as reporting and printing. For example, when an end user runs a report, Essentials returns the URL to the report. The viewer displays a hyperlink to the URL, which the user clicks to download the report.
Suppose your Essentials server is essentialsserver.internal.com and your reverse proxy is myreverseproxy.public.com. The URL that Essentials creates is based on internal.com, which the end user is not allowed to access. Configuring the external URL enables Essentials to convert the URL to the external form, public.com, which the user can access.
To configure Essentials to run behind a reverse proxy:
Step 1: Register the Reverse Proxy with Essentials
-
In the Post Installer, click Configure Geocortex Essentials REST API in the side panel.
-
Click Hosts.
-
In the empty text box at the bottom of the list, add the fully qualified host name for the reverse proxy, for example,
myreverseproxy.domain.com.If you are not using the default port (port 80 for HTTP, port 443 for HTTPS), make sure to include the port, for example,
myreverseproxy.domain.com:7630. -
If the reverse proxy uses SSL, make sure that
https://is selected in the Type drop-down menu.If the reverse proxy does not use SSL, select
http://from the Type drop-down menu.If you want the reverse proxy to accept both HTTP and HTTPS, without upgrading HTTP to HTTPS, register both versions of the URL and make sure that the HTTP version is higher in the list than the HTTPS version. Select the
 sort handle to drag an entry up or down in the list.
Note that HTTPS protects data exchanged between Essentials and users and we recommend upgrading to HTTPS.
sort handle to drag an entry up or down in the list.
Note that HTTPS protects data exchanged between Essentials and users and we recommend upgrading to HTTPS. 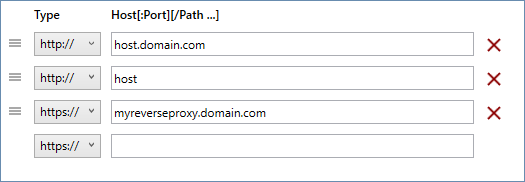
Example of a reverse proxy host name configured in the Post Installer
-
Select OK.
-
Select Finish.
Step 2: Configure the REST API's External URL (optional)
Do this step if you use different internal and external URLs for your servers.
-
In Manager, choose the Application Settings from Manager's header actions at the top of the page.

Location of Application Settings hyperlink
-
In the External REST URL text box, enter the URL to the REST API's root, for example:
https://myreverseproxy.public.com/Geocortex/Essentials/REST
-
Press OK.
The setting takes effect immediately.