Symbolization
There are two ways to give end users control of layer symbolization for feature layers and map services that have dynamic layers enabled:
-
In Manager, create layer styles that end users can select in a list.
You can reorder the list of layer styles and set the default layer style.
-
Enable end users to create new layer symbology and turn the symbolization on and off.
For information on how end users re-symbolize a layer, see User Experience.
Create a Layer Style in Manager
To create a layer style in Manager:
-
In
 next to the layer.
 -
Click the Styles tab.
-
Click Add Layer Style.
-
In the Display Name text box, type a name for the layer style.
The display name can include spaces and special characters. The display name appears in the list of layer styles that end users select from.
-
In the Definition text box, enter the JSON for an ArcGIS renderer.
Essentials supports simple, unique value, and class breaks renderers. For information, refer to the ArcGIS documentation on renderers .
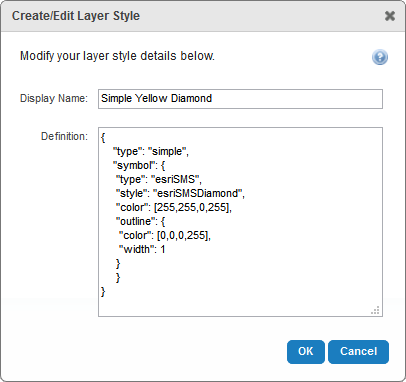
Example of a layer style definition
-
Click Save Site.
Reorder the List of Layer Styles
Layer styles appear in the viewer in the same order that they appear on the Styles tab in Manager.
To reorder the list of layer styles:
-
In
next to the layer. -
Click the Styles tab.
-
In the list of layer styles, click and hold a layer style that you want to move to a different position in the list.
-
Drag and drop the layer style to its new position.
-
Continue to drag and drop layer styles until the list is ordered the way that you want it.
-
Click Save Site.
Set the Default Layer Style
You can set the default style for features in a layer. The default style will not appear in the list from which end users can select a style.
To set the default layer style:
-
In
next to the layer. -
Click the Styles tab.
-
Beside the style you want to make the default for layers, click the Default checkbox.
If another style already has this checkbox selected, you must first deselect that checkbox before you can change the default style.
-
Click Save Site.
Enable End Users to Create New Layer Symbolization
To enable end users to create new symbolization for a layer and turn the symbolization on and off, turn on the layer's Allow Symbolization setting in Manager. The layer must be a feature layer or belong to a map service that meets the map service requirements for Dynamic Layers.
For ArcGIS dynamic map service layers, we recommend that you do not use layer transparency for layers that users can re-symbolize. This is configured in the map service itself, not in Essentials. Layer transparency cannot be edited or removed by the user, and it may lead to a confusing user experience. For these services, use only symbol transparency.
When a user configures symbolization for a layer, the new symbol replaces the layer icon that is configured for the layer in Manager. The user can turn the symbolization on and off. When symbolization is on, the user's symbol shows. When symbolization is off, the layer icon shows.
To create new symbolization for a layer, the user clicks the layer in the layer list, and then clicks the Symbolization hyperlink in the Layer Actions Menu. This opens the Symbolize Layers panel, which has settings for the symbolization type (simple, class breaks, unique values), symbol shape, size, border and fill color, and transparency. To turn symbolization on and off, the user clicks the layer in the layer list, and then changes the Symbolization checkbox in the Layer Actions Menu.
For more information, see LayerStyles Module and LabelOptions Module.
Enable End Users to Change a Layer's Symbolization
To enable end users to change a layer's symbolization:
-
In
-
Click the
 icon beside the map service to show the map service's layers.
 -
Click the drop-down menu icon
 beside the layer and select the Allow Symbolization checkbox.
If you clear the Allow Symbolization checkbox, end users will not be able to change the layer's symbolization.
-
Click Apply Changes.
Enable End Users to Change the Symbolization for Every Layer in a Map Service
To enable end users to change the symbolization for every layer in a map service:
Batch editing overwrites the existing configuration for every layer in the folder or service. The only way to restore the previous configuration after you click Apply Changes is to individually reconfigure each setting in each layer.
-
In
-
Click the drop-down menu icon
beside the map service. -
In the Batch Edit area, select the Allow Symbolization checkbox.
If you clear the Allow Symbolization checkbox, end users will not be able to change the symbolization for any layer in the map service.
-
Click Apply Changes.