Dynamic Layers
ArcGIS Server's Dynamic Layers feature enables other applications to change the appearance and behavior of the layers in the map service. Geocortex Essentials supports the Dynamic Layers feature.
Having Dynamic Layers enabled in an ArcGIS Server map service provides the following additional functions in Essentials:
-
Dynamic Layers: Add dynamic layers in Manager and enable end users to add dynamic layers in the viewer.
-
Layer Drawing Order: Change the drawing order of the map service's layers in Manager. Note that this does not affect the order that layers draw in HTML5 viewers.
-
Symbolization: Create layer styles that end users can select in a list. Enable end users to create new layer symbolization and turn the symbolization on and off.
-
Labels: Change the default visibility of a layer's labels in Manager, and enable end users to turn labels on and off in the viewer and modify the font.
Map Service Requirements for Dynamic Layers
To use ArcGIS Server's Dynamic Layers feature in Essentials, the map service must be published and configured in a particular way in ArcGIS Server:
-
Publish the Map Service
-
You must publish the map service as a Dynamic Map Service.
-
If you want to be able to change the default visibility of a layer's labels, or you want the end user to be able to turn the layer's labels on and off, the default visibility of the layer's labels must be turned on when you publish the map service. In addition, the layer must have label data.
-
-
Enable Dynamic Layers
When you enable Dynamic Layers:
-
Select Allow per request modification of layer order and symbology.
-
If you want to be able to add dynamic layers in Manager or in the viewer, you must configure a Dynamic Workspace.
For detailed instructions on enabling Dynamic Layers, refer to Esri's Dynamic Layers documentation.
-
Verify that the Dynamic Layers Feature is Enabled
To verify that an ArcGIS dynamic map service that you have added to a site supports dynamic layers:
-
In
-
Locate the Supports Dynamic Layers setting.
If Supports Dynamic Layers is True, the map service supports the Dynamic Layers feature. You can use Dynamic Layers functions in Essentials.
If Supports Dynamic Layers is False, the map service does not support the Dynamic Layers feature and you cannot use Dynamic Layers functions in Essentials.
You can also verify Dynamic Layers support by looking at the Supports Dynamic Layers property in the Geocortex Essentials REST API Sites Directory.
Verify that a Layer has Labels
To verify that a layer in an ArcGIS map service has labels:
-
Open the ArcGIS REST Services Directory for the map service that the layer belongs to.
You can do this from Essentials Manager:
-
Edit the map service.
-
Select
 View REST Endpoint.
The Geocortex Essentials REST API Sites Directory opens.
-
Select the Connection String hyperlink.
The ArcGIS REST Services Directory opens.
-
-
Select the hyperlink for the desired layer.
-
Locate the Has Labels property.
If Has Labels is
True, the layer has labels.If Has Labels is
False, the layer does not have labels and you cannot use the label visibility functions in Essentials.
Dynamic Layers
A dynamic layer is a layer that is configured outside of the map service's ArcGIS Server configuration. (The layers that are configured in ArcGIS Server are static.) There are two ways to add dynamic layers in Essentials:
-
JSON: Configure the JSON definition for the dynamic layers in Manager.
-
Legacy Layer Catalog: Build a layer catalog that defines the dynamic layers, and then point Manager to the layer catalog. This method of building a layer catalog requires custom development to your Essentials installation and has been deprecated in favor of layer catalog sites.
Both these methods require that the map service meet the map service requirements for Dynamic Layers.
Dynamic layers can be operated on in the viewer the same way as static layers—they can be searched, used in identify operations, printed, and so on.
Add Dynamic Layers Using JSON
In this method, you add a dynamic layer to a map service by pasting the JSON definition for the layer into Manager. The JSON definition must comply with the ArcGIS Server specification for dynamic layers. For information, refer to ArcGIS REST API, Dynamic Layer / Table.
Example JSON for a Dynamic Layer
 {
  "id": 1234,
  "source": {
   "type": "dataLayer",
   "dataSource": {
    "type": "table",
    "workspaceId": "CharlotteFolder",
    "dataSourceName": "schools"
   }
  },
  "drawingInfo": {
   "renderer": {
    "type": "simple",
    "symbol": {
     "type": "esriSMS",
     "style": "esriSMSDiamond",
     "color": [255,255,0,255],
     "outline": {
      "color": [0,0,0,255],
      "width": 1
     }
    }
   }
  }
 }
To add a layer from a JSON definition:
-
In
-
Click the Add/Remove Layers tab.
-
Click the Add Dynamic Layer icon at the top of the Included Layers list.
If there is no Add Dynamic Layer icon, make sure the layer catalog has been added to the map service that you are editing. Follow the instructions to add the layer catalog.
-
Select Create a new Layer from a JSON definition, and then Next.
-
In the Layer Name box, type the name that you want to display for this layer.
-
In the Dynamic Definition text box, paste the JSON definition for the layer.
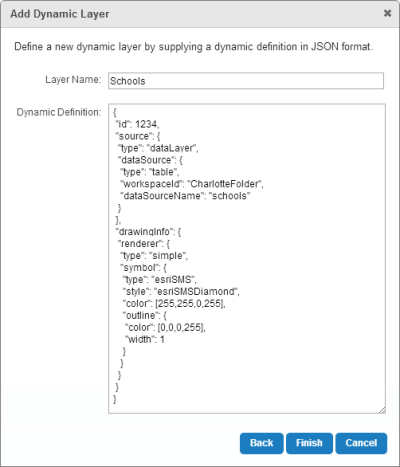
Add a dynamic layer to a map service using the layer's JSON definition
-
Click Finish.
-
Click Submit Layer Changes.
-
Click Save Site.
The new layer is added to the map service. It appears at the top of the list on the Map Services tab.
By default, the layer's visibility is turned off. To see the layer in the map preview, select the checkbox beside the layer on the Map Services tab.
Legacy Layer Catalogs
The Legacy Layer Catalogs feature requires custom development to your Essentials installation and has been deprecated in favor of layer catalog sites. Legacy layer catalogs only work with dynamic layers.
The Legacy Layer Catalog feature allows you to add a catalog of layer definitions that can be used to add dynamic layers to a map service. Layers are ordered automatically so that each layer has adequate visibility: polygon layers appear on the bottom, then lines, then points. Once the layer catalog is built, its custom assemblies are integrated into the Essentials REST API and Manager. The layer catalog is then configured in Manager following the procedure below.
To add a legacy layer catalog to a map service in Manager:
-
In
-
In the Layer Catalog Provider Name drop-down list, select the layer catalog.
-
Click Apply Settings.
-
Click Save Site.
You can now add layers from the catalog using Manager, and enable end users to add layers from the catalog.
Use a Legacy Layer Catalog to Add Dynamic Layers in Manager
To add dynamic layers from a legacy layer catalog using Manager:
-
In
-
Click the Add/Remove Layers tab.
-
Click the Add Dynamic Layer icon at the top of the Included Layers list.
If there is no Add Dynamic Layer icon, make sure the layer catalog has been added to the map service that you are editing. Follow the instructions to add the layer catalog.
-
Select Select predefined layers from a catalog, and then click Next.
-
Select the checkbox beside each layer that you want to add to the map service.
-
Click OK.
-
Click Submit Layer Changes.
-
Click Save Site.
Layer Drawing Order
You can change the order that a map service's layers are represented on the map. When a layer lies on top of another layer, the upper layer may obscure part or all of the layer underneath. By default, the layers are drawn in the order that they appear in the map service.
The map service must meet the map service requirements for Dynamic Layers.
Change the Layer Drawing Order
To change the drawing order of layers in a Dynamic Layers-enabled map service:
-
In
-
Click the Drawing Order tab.
If there is no Drawing Order tab, the map service is not an ArcGIS Server dynamic map service with Dynamic Layers enabled.
-
Click and hold the Sort icon
 beside a layer you want to move, and then drag the layer to the new position in the list.
 -
Continue dragging and dropping layers until the layers are sorted the way you want them.
-
Click Submit Layer Changes.
-
Click Save Site.
Reset the Layer Drawing Order
To reset the drawing order to the default order:
The default order is the order that the layers appear in the map service.
-
In
-
Go to the Drawing Order tab.
If there is no Drawing Order tab, the map service is not an ArcGIS Server dynamic map service with Dynamic Layers enabled.
-
Click Reset
 .
. -
Click Submit Layer Changes.
-
Click Save Site.
Symbolization and Dynamic Layers
Map services with dynamic layers enabled give end users control of layer symbolization from the viewer. There are two ways you can give end users control of layer symbolization for feature layers or map services that have dynamic layers enabled:
-
Create layer styles that end users can select in a list.
-
Enable end users to create new layer symbolization and turn the symbolization on and off.
Symbolization can also be enabled for feature layers.
For symbolization configuration information, see Symbolization.
Labels
Set the Default Visibility of Labels
You can configure the default visibility of a layer's labels. The layer must belong to a map service that meets the map service requirements for Dynamic Layers.
If you turn on label visibility, by default users will see the labels when they zoom the map to show the layer's features. If you turn off the default visibility, the labels are initially hidden. Users can turn the labels on and off in the viewer, regardless of how the default visibility is configured.
To set the default visibility of a layer's labels:
-
In
-
Click the expand icon
 beside the map service to show the map service's layers.
 -
Use the drop-down menu
 beside the layer to do one of the following:
-
Show Labels Initially: Select the Show Labels checkbox.
-
Hide Labels Initially: Clear the Show Labels checkbox.
-
-
Click Apply Changes.
You can also set the default visibility of a layer's labels using the Show Labels setting on the layer's Details tab.
To set the default visibility of the labels in every layer in a map service:
Batch editing overwrites the existing configuration for every layer in the folder or service. The only way to restore the previous configuration after you click Apply Changes is to individually reconfigure each setting in each layer.
-
In
-
Use the drop-down menu
beside the map service. -
In the Batch Edit area, do one of the following:
-
Show Labels Initially: Select the Show Labels checkbox.
-
Hide Labels Initially: Clear the Show Labels checkbox.
-
-
Click Apply Changes.
Enable End Users to Turn a Layer's Labels On and Off
You do not need to do any additional configuration to enable end users to turn a layer's labels on and off or change the font. If the layer belongs to a map service that meets the map service requirements for dynamic layers, then working with labels is automatically available in viewers.
To turn a layer's labels on or off, the user clicks the layer in the Map Layers panel and then clicks Toggle labels in the Layer Actions Menu. To change attributes of the font, the user clicks the Customize labels in the Layer Actions Menu.
You can configure additional font families for users to choose from when they change the font that is used for labels. For instructions, see to LabelOptions Module.