Install on an Android Device
Main Steps
The main steps to install and set up the Geocortex Mobile App Framework are:
-
Install the App on the device.
-
Register the App with Essentials.
The end user only needs to do this if the App is not preregistered in the installation package.
-
License the App using your ArcGIS Runtime SDK license.
The end user only needs to do this if the license is not preconfigured in the installation package.
-
Download additional resources.
The end user only needs to do this if you have made additional resources available that the user wants to use, for example, locale files.
Allow the Installation of non-Play Store Apps
To allow the installation of apps from sources other than the Play Store:
-
On the device, open Settings.
-
Under PERSONAL, tap Security.
-
Under DEVICE ADMINISTRATION, ensure the Unknown sources checkbox is selected.
Install the App
To install the Geocortex Mobile App Framework onto an Android device:
-
Download the
Geocortex-Mobile-App-Framework-2.3.2.apkfile to the device. -
Open the
Geocortex-Mobile-App-Framework-2.3.2.apkfile. -
Tap Install.
The App is installed.
-
Tap Done.
Once the App is installed, users can open the App the same way they would open any app on their device.
The newly-installed App contains a sample viewer and no resources.
Apply your ArcGIS Runtime SDK License
You can skip this procedure if you are using:
-
The Basic license that comes with the Geocortex Mobile App Framework
-
A customized installation package with the license preconfigured
Apply your Basic License
To license the App using your ArcGIS Runtime SDK Basic license:
-
Open the following URL in the device's web browser:
gcx://arcgislicensing?arcgisclientid=
MyClientIDMake sure to replace
MyClientIDwith your own Client ID.To make the URL easy to visit, create a QR code or hyperlink and publish it to a website or email it to users.
This applies the license. The App is now licensed with your Basic license.
Apply your Standard License
To license the App using your ArcGIS Runtime SDK Standard license:
-
Open the following URL in the device's web browser:
gcx://arcgislicensing?arcgislicensecode=
runtimestandard,101,rux00000,none,XXXXXXXMake sure to replace the value of the
arcgislicensecodeparameter with your own license code.We recommend that you URL-encode the license code in the URL. This replaces the commas (,) with %2C—some browsers do not handle commas well.
You can optionally set the Client ID by using the
arcgisclientidURL parameter. For example:gcx://arcgislicensing?arcgisclientid=
MyClientIDMake sure to replace
MyClientIDwith your own Client ID.This applies the license. The App is now licensed with your Standard license.
Apply your Portal for ArcGIS or ArcGIS Online License
To license the App using Portal for ArcGIS or ArcGIS Online:
-
Open the App on the device and sign in to Portal for ArcGIS or ArcGIS Online.
This applies the license. The App is now licensed with the license that is associated with your Portal for ArcGIS or ArcGIS Online account.
Register the App with Geocortex Essentials
Registering the Geocortex Mobile App Framework with an Essentials instance allows the App to download viewers automatically to the user's device and offer users a list of viewers to add. You only need to register the App once.
If you obtained a customized installation package from VertiGIS Studio Support, you can skip this step—the App is already registered with Essentials.
There are a few ways to register the App:
Use the Essentials Registration Page to Register the App with Essentials
Geocortex Essentials ships with a registration page that is deployed to IIS when you install Essentials. The registration page has a QR code that registers the App with that instance of Essentials when scanned by the device that the App is installed on. If the device does not support scanning QR codes, you can enter the registration page's URL instead of scanning the QR code.
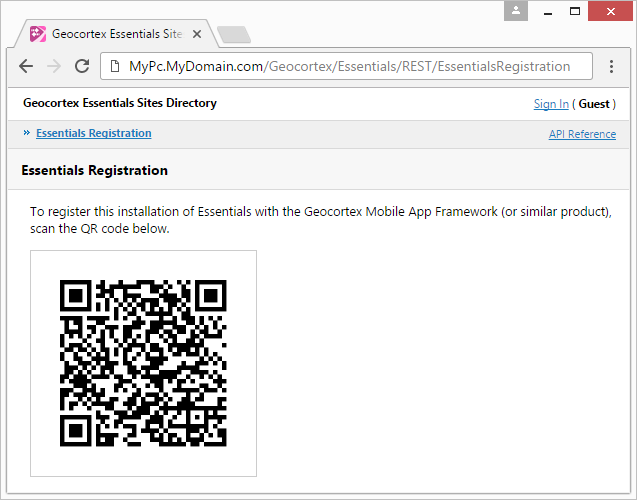
Example Essentials Registration page
To use the Essentials Registration page to register the App:
-
On a different device, open the Essentials Registration page for the instance of Essentials you want to register the App with. For example:
http://MyServer.com/Geocortex/Essentials/REST/EssentialsRegistration
Be sure to replace
MyServer.comwith your Essentials host name. -
Use the device to scan the QR code on the Essentials Registration page.
If the device does not support scanning QR codes, enter the registration URL into the device's web browser. For example:
gcx://essentialsinstance?url=http://
MyServer.com/Geocortex/Essentials/RESTBe sure to replace
MyServer.comwith your Essentials host name.
Use the App to Register with Essentials
To use the App to register with Essentials:
You can also use this method to change the instance of Essentials that the App is registered with.
-
In the App, on the Saved Viewers page, tap
 .
.The side menu opens.
-
Tap Set Essentials Instance.
-
Type the URL to your Geocortex Essentials instance and tap OK. For example:
http://
MyServer.com/Geocortex/Essentials/REST
Use a Launch Link to Register the App with Essentials
To use a launch link to register the App with Essentials:
-
In Geocortex Essentials Manager, edit the site that contains the viewer.
-
In the side panel, click Viewers.
-
Click the Edit icon
 beside the viewer for which you generated the offline data.
The Launch in Geocortex Mobile App Framework link that appears is the launch link. A corresponding QR code appears when the mouse pointer is hovered over the QR code icon beside the link.
-
Use any of the following methods to make the viewer available to end users:
-
Create a link or QR code that points to the URL. Publish the link or QR code to a website that end users have access to, or send the link or QR code in an email.
To add the viewer, users either scan the QR code, or open the email on the device and tap the link. The viewer appears on the Saved Viewers page.
-
Send users the URL.
To add the viewer, users type or paste the URL into the address bar of a web browser on the device. The viewer appears on the Saved Viewers page.
Chrome for Android does not handle these URLs properly. Typing the URL into the address bar does not work in Chrome for Android.
-
Download Additional Resources
If you have made additional resources available to end users, such as locale files, users can download the resources now. To download a resource, the user taps the resource's link or scans the QR code that you have provided.
For more information, see Create and Deploy Additional Resources.