When you create a new AOP application, it is pre-configured and ready to use. You can adjust many of the configuration settings in Geocortex Essentials Manager.
However, your AOP application also contains a few small custom modules implemented and integrated using the standard mechanisms available to Geocortex customers. You can configure these in the Viewer configuration files:
You need to ensure that any changes are made to all three configuration files. The default installed location for these files is:
C:\Program Files (x86)\Latitude Geographics\Geocortex Essentials\Default\REST Elements\Sites\AOP\Viewers\AOP_Viewer\VirtualDirectory\Resources\Config\Default
Some of the configuration tasks that you can set up in the Viewer Configuration files include the following:
AOP ships with a default library of images that contain the most common icons used to label items on the map. However, it is possible to add your own images to AOP that represent your organization’s own icons.
![]()
Icons in the Incident Response Library
The default installed location for the point image libraries that ship with AOP is:
C:\Program Files (x86)\Latitude Geographics\Geocortex Essentials\Default\REST Elements\Sites\Resources\Symbols\image\
Each file in this folder represents a library of images. The AOP image library file is called Incident Response.json.
Within the library file, each image is represented as a named entry , for example:
{
 "imageData" : "iVBORw0KGgoAAAANSUhEUgAAACoAAAAqCAYAAADFw8lbAAAAGXRFWHRTb2Z0d2FyZQBBZG9iZSBJbWFnZVJlYWR5ccllPAAAAa9JREFUeNrsmcttg0AQhmdXLiAl7CU5kwpMTsktuINQgUuwKIEKcAfZ3JKT7QrCOb5QgjtIZq0BEWANZo0ZJP/SCMtG+NM8dplZAT318/qs8BKgzdHMZ89ya4aWou3Q9MPHV9bn/0QPwDe8LE+AtclAxwi8HgSUAFfkvUvIeDbqCiw6hjhB82EYbdHCtpQQLZABQd7BsDoQrD4blEKdwHUV2lJBMII8CSss4X6HcbWopoFoKJzvK+Rkl5x9LBeYrNyQMIAEYviXerKSlz7wkU9MR81KP6xcnnqvPxu/3wcvLo81TOvCo0SugJ9U7tU89EvgqyObpEr3GIN6hlHSqxp3BZLeJ7lrLpmHvSgqgfH/dV2C+uqcpUvCRHQDvYFy14y6QeVapQO9lBQttqQ+m7sySRMM7toZUD0BUC2pL+Ec/tQw5lUfMwaNi+WJ+uiMYxHlPX65Z4pchg4XWoaqimx9/YZRJ7pFbz7ZdqaQmv+xdSCW5i2UVoCQAWhtDFnb62nmE44MWVvbpz12LMHyH+SWYBVwH403pALfwwYLMN/jG0tKdDkQS8l7TgdifwIMALAyobKuTs6tAAAAAElFTkSuQmCC",
     "height" : 42,
     "xoffset" : 0,
     "yoffset" : 0,
     "width" : 42,
     "name" : "EMS First Responders",
     "contentType" : "image/png",
     "type" : "esriPMS",
     "angle" : 0,
     "url" : ""
},
The order of these image entries in the file determines the order of the items in the preview panel and in the application, which means that you can rearrange the order of the images displayed to the order you prefer.
You can also edit which libraries are seen and in what order in the .json.js configuration files. The order they are listed is the order they will appear in the application.
For example:
{
    "id": "PictureSymbolWidget",
    "type": "geocortex.essentialsHtmlViewer.mapping.infrastructure.symbology.PictureSymbolWidget",
    "markup": "Mapping/infrastructure/symbology/widgets/PictureSymbolWidget.html",
    "viewModelType": "geocortex.essentialsHtmlViewer.mapping.infrastructure.symbology.PictureSymbolWidgetViewModel",
    "libraryId": "Mapping.Infrastructure",
    "configuration": {
    "imageLibraries": [
        "Incident Response",
        "Damage",
        "Disasters",
        "Shapes",
        "Arrows",
        "Basic",
        "Cartographic",
        "A-Z",
        "Numbers"
        ],
    "imageSize": {
        "min": 16,
        "max": 64,
        "value": 32,
        "step": 1
        }
    }
}
Encoded images can be used to optimize load times. The advantage of encoding is that there is no need to open another connection and make an HTTP request to the server for the image. The benefit is lost very quickly so it is only an advantage if you plan to use large numbers of icons. If you wish to encode your images, you can use one of many free web-based tools, for example, http://base64encode.net/base64-image-encoder.
You can add a collaboration channel in the AOP application on the Collaboration tab. See Collaboration in the Geocortex Viewer for HTML5 Installation documentation for more information about Collaboration.
To add a collaboration channel:
At the bottom of the side panel, click the Collaboration icon ![]() to open the Collaboration tab.
to open the Collaboration tab.
At the top of the side panel, click the down arrow on the Join a Channel drop-down list.
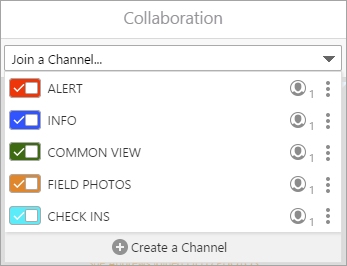
Click Create a Channel.
In the Name field, type a display name for this channel and then select a color to represent it in the slider of the Channel list and on messages.
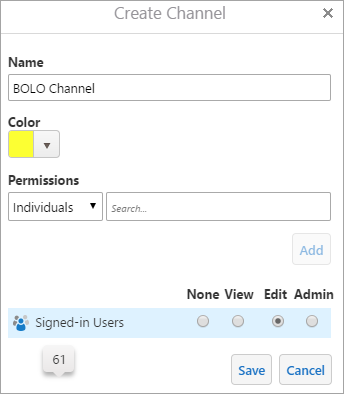
Select the Groups or Individuals that you want to participate in the channel and then click Add.
Grant the user or group permissions from the selection of None, View, Edit or Admin.
Click Save.
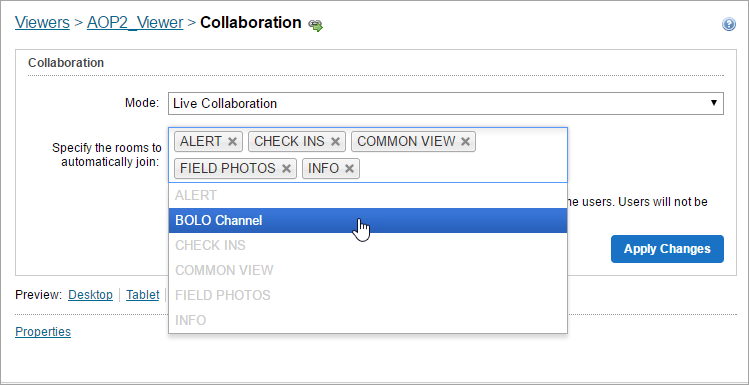
By default, when you launch AOP, the application is configured so you auto-join all users to the out-of-the-box collaboration channels ALERTS, INFO, COMMON VIEW, FIELD PHOTOS, CHECK INS. If you add your own collaboration rooms, you can configure AOP to auto-join them as well. Once you have added the channel in the AOP application, it appears in Geocortex Essentials for you to select.
To add a new channel to the to the auto-join list:
Log into Geocortex Essentials Manager.
Click your AOP site to edit it.
In the Site panel, click Viewers .
Click ![]() beside your AOP viewer.
beside your AOP viewer.
In the Viewer for HTML5 side panel, click Collaboration.
By default, AOP is configured to monitor the out-of-the-box ALERTS collaboration channel and to generate alerts when new events arrive. You can extend this ability to monitor additional collaboration channels for alerts. You add this information directly in the Desktop.json.js, Tablet,json.js, and Handheld.json.js configuration files.
To add an alert you find the collaboration channel ID in Geocortex Essentials Manager.
To add the ID another channel to the configuration files:
NotificationsViewModel.In the "alertsRoomIds":[, paste the ID of the collaboration channel you want to receive alerts.
"viewModels": [
          {
            "id": "NotificationsViewModel",
            "require": "AOP/AOP/NotificationsViewModel",
            "configuration": {
            "alertsRoomIds": [
            "d03e4d60597b49ec8dce38a933b83306",
            "paste-additional-collaboration-channel-id-here"
           ]
          }
        }
      ]
When you are in After Action Playback (AAP) and you select a collaboration channel, the application calculates the earliest and latest relevant events and then it updates your time slider with this information. Some collaboration channels like ALERTS or COMMON VIEW have large date ranges, which means that there is a lot of data to parse.
To ensure that you can view the content of important channels for playback and focus on the time extent of your incident, rooms are configured to be ignored in this calculation. By default, all the out-of-the-box rooms - ALERTS, INFO, COMMON VIEW, FIELD PHOTOS, CHECK INS- are excluded. If you have another reference channel you wish to be excluded from this calculation, you can do so by adding the collaboration channel ID to the timeExtentExcludeRooms list.
To exclude a channel from AAP, you need to find the collaboration channel ID in Geocortex Essentials Manager.
To exclude a channel from AAP:
timeExtentExcludeRoomsIn the "timeExtentExcludeRooms": [, paste the ID of the collaboration channel you want to receive alerts.
"id": "AfterActionViewModel",
         "type": "geocortex.essentialsHtmlViewer.mapping.modules.collaboration.AfterActionViewModel",
         "require": "Mapping/modules/Collaboration/Views/AfterAction/AfterActionViewModel",
         "configuration": {
             "applicationId": "AOP2",
             "timeExtentExcludeRooms": [
             "d03e4d60597b49ec8dce38a933b83306",
             "c49eef5c28df4fa89f363ea7f65e76c6",
             "dc964e6ebaea493ea66e5ef1631a1b03",
             "e4f5aec8a73346a5b23c9075f1cec568",
             "paste-collaboration-channel-id-here-to-exclude-it"
          ]